Introduction
Angular Forms provide a framework support for two-way data binding, change tracking, validation and error handling.
There are two approaches to build forms in Angular.
- template-driven form
- reactive(model-driven) form
Template-driven form
Reactive forms is an Angular technique for creating forms in in Angular template syntax with form-specific directives such as ngForm, ngModel.
Steps
- Build an Angular form with a component and template. Then use
ngModelto create two-way data bindings for reading and writing input control values - Form validation
- Track form control’s state and validity with ngModel
- Provide visual feedback using custom CSS classes
- Show and hide validation errors to users
- Handle form submission with
ngSubmit
build an Angular form with a component and template
-
add a model - Hero.ts
export class Hero { constructor( public id: number, public name: string, public power: string, public alterEgo?: string ) { } } -
add form component - HeroForm.component.ts
import { Component } from '@angular/core'; import { Hero } from '../hero'; @Component({ selector: 'app-hero-form', templateUrl: './hero-form.component.html', styleUrls: ['./hero-form.component.css'] }) export class HeroFormComponent { powers = ['Really Smart', 'Super Flexible', 'Super Hot', 'Weather Changer']; model = new Hero(18, 'Dr IQ', this.powers[0], 'Chuck Overstreet'); submitted = false; onSubmit() { this.submitted = true; } // TODO: Remove this when we're done get diagnostic() { return JSON.stringify(this.model); } } -
hero-form.component.html
  <div class="container">
      <h1>Hero Form</h1>

      <!-- declare a template variable for the form. The variable `heroForm` is now a reference to the NgForm directive that governs the form as a whole. -->
      <form #heroForm="ngForm">

        <div class="form-group">
          <label for="name">Name</label>
          <input type="text" class="form-control" id="name"
             required
             [(ngModel)]="model.name" name="name">
        </div>

        <div class="form-group">
          <label for="alterEgo">Alter Ego</label>
    		<input type="text"  class="form-control" id="alterEgo"
           [(ngModel)]="model.alterEgo" name="alterEgo">
        </div>

      <div class="form-group">
        <label for="power">Hero Power</label>
        <select class="form-control"  id="power"
                required
                [(ngModel)]="model.power" name="power">
          <option *ngFor="let pow of powers" [value]="pow"></option>
        </select>
      </div>

        <button type="submit" class="btn btn-success">Submit</button>

      </form>
  </div>
Please note:
-
Angular automatically creates and attaches an NgForm directive to the
<form>tag via#heroForm="ngForm". The NgForm directive supplements the form element with additional features. It holds the controls you created for the elements with an ngModel directive and name attribute, and monitors their properties, including their validity. It also has its own valid property which is true only if every contained control is valid. -
Angular creates
FormControlinstances and registers them with anNgFormdirective that Angular attached to the<form>tag. Each FormControl is registered under the name you assigned to thenameattribute.
-
-
update application’s root module - app.module.ts, import
FormsModuleimport { NgModule } from '@angular/core'; import { BrowserModule } from '@angular/platform-browser'; import { FormsModule } from '@angular/forms'; // added import { AppComponent } from './app.component'; import { HeroFormComponent } from './hero-form/hero-form.component'; // added @NgModule({ imports: [ BrowserModule, FormsModule // added ], declarations: [ AppComponent, HeroFormComponent // added ], providers: [], bootstrap: [ AppComponent ] }) export class AppModule { } -
Update application’s root component - app.component.html
<app-hero-form></app-hero-form>
Form validation
Using ngModel in a form gives us not only two-way data binding, but also tells us if the user touched the control, if the value changed, or if the value became invalid. Specifically, it attaches additional classes in different states:
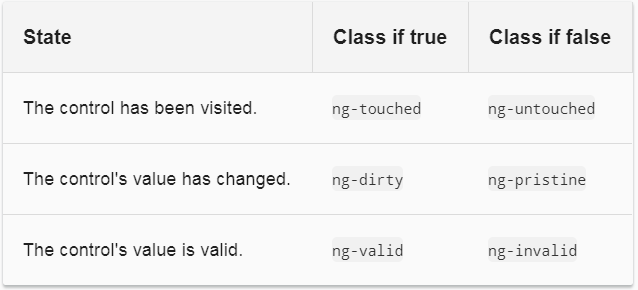
track form control’s state and validity with ngModel
e.g. hero-form.component.html
<input type="text" class="form-control" id="name"
required
[(ngModel)]="model.name" name="name"
#spy>
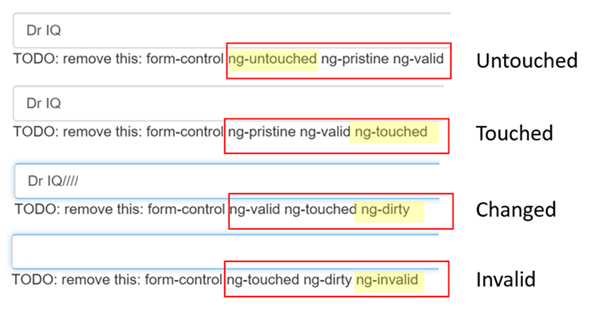
<br>TODO: remove this:
Here, we temporarily add a template reference variable named spy to the Name <input> tag and use it to display the input’s CSS classes.
- We look but don’t touch the textbox
- Click inside the name box, then click outside it.
- Add slashes to the end of the name.
- Erase the name.
We will get respectively:
Provide visual feedback using custom CSS classes
Next, we add css classes to implement visualized validation
forms.css
.ng-valid[required], .ng-valid.required  {
  border-left: 5px solid #42A948; /* green */
}

.ng-invalid:not(form)  {
  border-left: 5px solid #a94442; /* red */
}
Add this css to index.html
<link rel="stylesheet" href="assets/forms.css">
Then we got

Show and hide validation errors to users
We make some changes to hero-form.component.html
<label for="name">Name</label>
<input type="text" class="form-control" id="name"
       required
       [(ngModel)]="model.name" name="name"
       #name="ngModel">
<div [hidden]="name.valid || name.pristine"
     class="alert alert-danger">
  Name is required
</div>
Here, we add
- a template reference variable called
nameand gave it the value “ngModel”. It can access the input box’s Angular control from within the template. - a “is required” error message in <div>, which you’ll display only if the control is invalid.
Handle form submission with ngSubmit
bind the form’s ngSubmit event property to the hero form component’s onSubmit() method:
hero-form.component.html
<form (ngSubmit)="onSubmit()" #heroForm="ngForm">
	...
	<button type="submit" class="btn btn-success" [disabled]="!heroForm.form.valid">Submit</button>
</form>
hero-form.component.ts
submitted = false;

onSubmit() {
	// connect remote api to process submission
	...
	this.submitted = true;
}
Reactive form
Reactive forms is an Angular technique for creating forms in a reactive style. With reactive forms, we create a tree of Angular form control objects in the component class and bind them to native form control elements in the component template.
Steps
- Build a reactive form with a component and template.
- Add a FormGroup
- Use FormBuilder to quickly build FormGroup
- Form validation
- Track form control’s state and validity with ngModel
- Provide visual feedback using custom CSS classes
- Show and hide validation errors to users
- Handle form submission with
ngSubmit
Build a reactive form with a component and template.
-
Create data models: data-model.ts
export class Hero { id = 0; name = ''; addresses: Address[]; } export class Address { street = ''; city = ''; state = ''; zip = ''; } export const heroes: Hero[] = [ { id: 1, name: 'Whirlwind', addresses: [ {street: '123 Main', city: 'Anywhere', state: 'CA', zip: '94801'}, {street: '456 Maple', city: 'Somewhere', state: 'VA', zip: '23226'}, ] }, { id: 2, name: 'Bombastic', addresses: [ {street: '789 Elm', city: 'Smallville', state: 'OH', zip: '04501'}, ] }, { id: 3, name: 'Magneta', addresses: [ ] }, ]; export const states = ['CA', 'MD', 'OH', 'VA']; -
Create a reactive forms component hero-detail.component.ts
  import { FormControl } from '@angular/forms';
  export class HeroDetailComponent1 {
    name = new FormControl();
  }
Here,
FormControlis a directive that allows us to create and manage aFormControlinstance. It tracks the value and validation status of an individual form control. It corresponds to an HTML form control such as an<input>or<select>. -
Create the template hero-detail.component.html
  <h2>Hero Detail</h2>
  <h3><i>Just a FormControl</i></h3>
  <label class="center-block">Name:
    <input class="form-control" [formControl]="name">
  </label>
Here, we associate the FormControl
namein the component to the formControl in the template of element. -
Update application’s root module - app.module.ts, import
ReactiveFormsModuleimport { NgModule } from '@angular/core'; import { BrowserModule } from '@angular/platform-browser'; import { ReactiveFormsModule } from '@angular/forms'; // <-- #1 import module import { AppComponent } from './app.component'; import { HeroDetailComponent } from './hero-detail/hero-detail.component'; @NgModule({ declarations: [ AppComponent, HeroDetailComponent, ], imports: [ BrowserModule, ReactiveFormsModule // <-- #2 add to @NgModule imports ], bootstrap: [ AppComponent ] }) export class AppModule { } -
Update application’s root component app.component.html
  <div class="container">
    <h1>Reactive Forms</h1>
    <app-hero-detail></app-hero-detail>
  </div>
Add a FormGroup
If we have multiple FormControls, we register them within a parent FormGroup.
hero-detail.component.ts
import { Component }              from '@angular/core';
import { FormControl, FormGroup } from '@angular/forms';
export class HeroDetailComponent2 {
  heroForm = new FormGroup ({
    name: new FormControl()
  });
}
hero-detail.component.html
<h2>Hero Detail</h2>
<h3><i>FormControl in a FormGroup</i></h3>
<form [formGroup]="heroForm">
  <div class="form-group">
    <label class="center-block">Name:
      <input class="form-control" formControlName="name">
    </label>
  </div>
</form>
Here, formGroup is a reactive form directive that takes an existing FormGroup instance and associates it with <form> element.
Use FormBuilder to quickly build FormGroup
FormBuilder class helps us to build FormGroup easily.
hero-detail.component.ts
import { Component }              from '@angular/core';
import { FormBuilder, FormGroup } from '@angular/forms';

export class HeroDetailComponent3 {
  heroForm: FormGroup; // <--- heroForm is of type FormGroup

  constructor(private fb: FormBuilder) { // <--- inject FormBuilder
    this.createForm();
  }

  createForm() {
    this.heroForm = this.fb.group({
      name: '', // <--- the FormControl called "name", initial value is an empty string
    });
  }
}
Form validation
hero-detail.component.ts
import { Component }                          from '@angular/core';
import { FormBuilder, FormGroup, Validators } from '@angular/forms';
this.heroForm = this.fb.group({
  name: ['', Validators.required ],
});
Reactive forms vs template-driven forms
Reactive forms are synchronous (as you create controls from you code). In reactive forms, you create the entire form control tree in code. You can immediately update a value or drill down through the descendants of the parent form because all controls are always available.
template-driven forms are asynchronous (as it delegate task of creation of control) Template-driven forms delegate creation of their form controls to directives. To avoid “changed after checked” errors, these directives take more than one cycle to build the entire control tree. That means you must wait a tick before manipulating any of the controls from within the component class. In template driven from we write [NgModel] or [NgForm] (directives) that will take task of creation of your control on web page in htm and the creation is asynchronous.
Therefore, using template-driven form, if we try to access a form control in ngOninit(), the control may not accessible because the component just finished creating itself and subcomponents and may not complete rending views. Only in ngAfterViewInit(), we can confirm the views complete rendering and form controls are accessible. Therears, using reactive form, we can always find control where in Template driven from we cannot.