This article introduces how to apply Google reCAPTCHA into form submission of your site
CAPTCHA is a system designed to distinguish human from machine input. It is typically used in websites with images of words and prevent machine sends spam and automated requests.
Google reCAPTCHA is a free service that helps protect websites from spam and abuse. It can be easily integrated into our application and provides CAPTCHA verification.
Steps to apply Google reCAPTCHA
- Register reCAPTCHA keys
- Add client-side widget
- Add server-side verification
- A complete demo
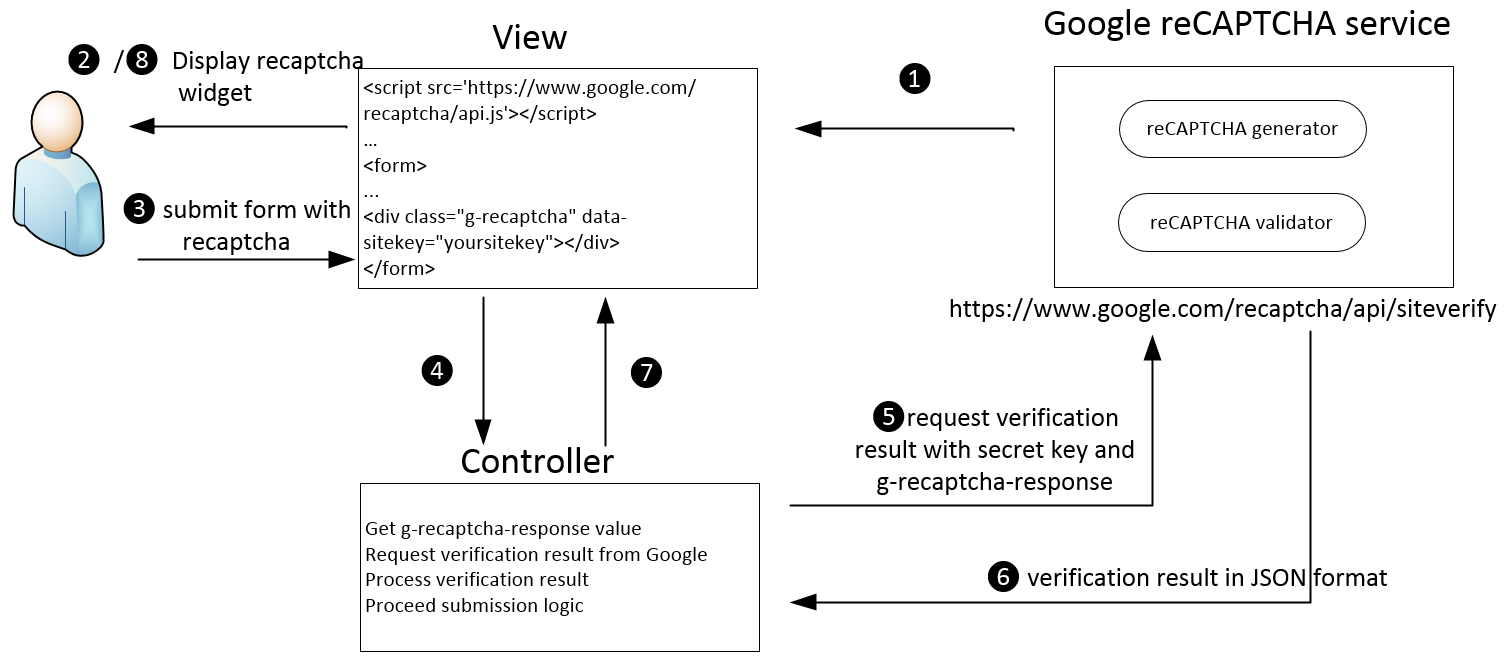
Here is the workflow of Google reCAPTCHA

Basically, the structure of constructing reCAPTCHA in your site include two parts.
The first part is add client-side widget using HTML and Javascript.
The second part is add server-side verification through communicating with Google reCAPTCHA service. It can be written in multiple server languages such as C#, Java, PHP and etc.
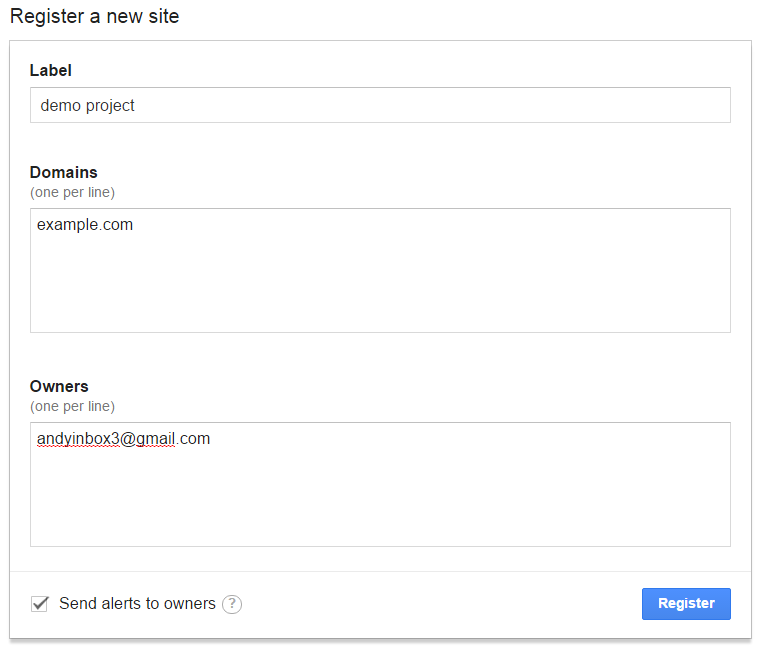
Step 1: Register Google reCaptcha
If you have google account, please register reCaptcha key at https://www.google.com/recaptcha/admin

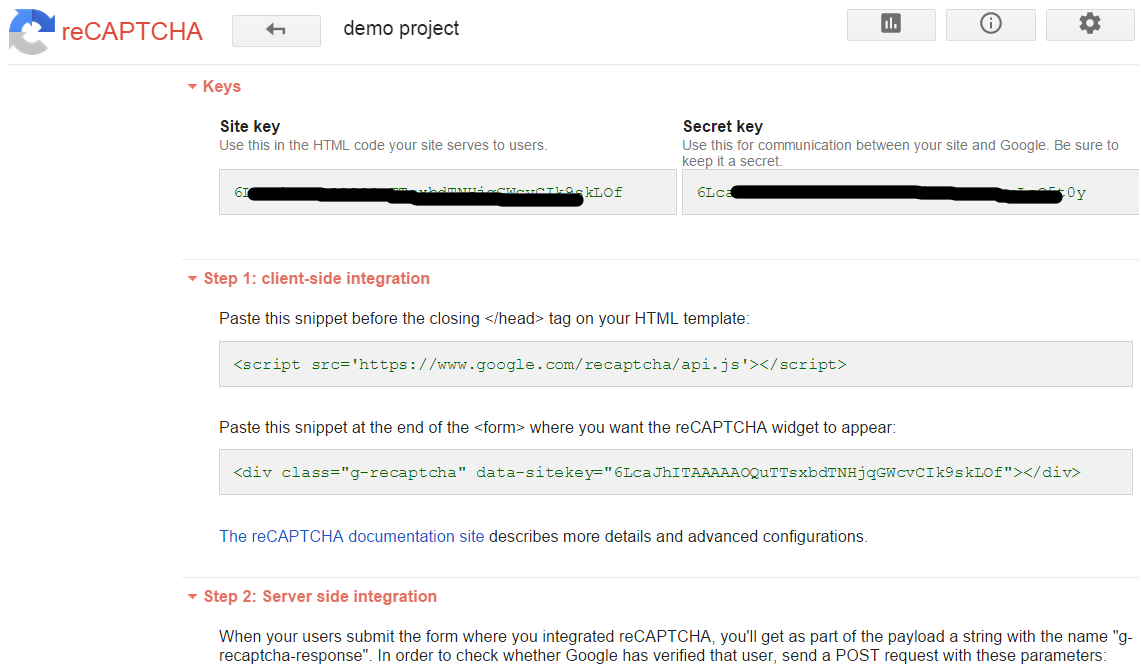
click register button and you will get 2 keys: site key and secret key

site key is used in the Html code your site and servers to users
secret key is used for communicaiton between your site and Google. Be sure to keep it secret.
Step 2: Add client-side widget to your site
Now you are ready to add recaptcha when user submit a form
Paste this snippet before the closing </head> tag on your HTML template:
<head>
	...
	<script src='https://www.google.com/recaptcha/api.js'></script>
	...
</head>
Paste this snippet at the end of the <form> where you want the reCAPTCHA widget to appear:
<form>
	...
	<div class="g-recaptcha" data-sitekey="yoursitekey"></div>
	...
</form>
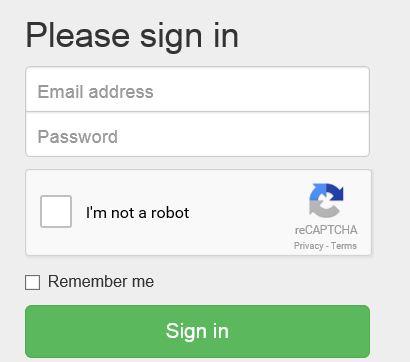
Now, start your form and you will see the reCapcha control appears. It covers the steps 1-2 in the workflow digram.
- Google’s reCAPTCHA service generates the control and transmit to the view of your site.
- Then, it is rendered and displayed in user’s browser.

Step 3: Add server-side verification
Next, we will write server programming to handle submission request. Heres
Once the reCAPTCHA is rendered in user’s browser, a field with the name of g-recaptcha-response will be populated in the html. Following is the steps 3-8 in the workflow diagram.
-
Once the user solves the reCAPTCHA and submit the form on your website, the value of g-recaptcha-response field is posted to the controller of server side.
-
Controller get the value of g-recaptcha-response field. Please note that in controller, we can use multiple platforms to implement this feature such as .NET, J2EE and PHP.
-
Controller sends GET request to https://www.google.com/recaptcha/api/siteverify with secret key and the value of ‘g-recaptcha-response’. It looks like:
https://www.google.com/recaptcha/api/siteverify?secret=yoursecretkey&response=valueOfG-recaptcha-response -
Controller gets the verification result of reCAPTCHA in JSON format. It looks like:
{ "success": true|false, "error-codes": ... //optional } -
Controller process the verification result.
- If verification failed, pass the result to view to display message and allow user to retry
- If verification succeeded, proceed the form submission
-
View display reCAPTCHA message if verification failed.
Please note that for the convenience of testing purpose, if we access reCAPTCHA based on localhost. Google reCAPTCHA always returns success result. e.g. http://localhost/applicationname/xxxx. But this strategy not include http://localhost:port/applicationname
A complete demo
Client-side (View):
@using (Html.BeginForm("Login", "Account", FormMethod.Post, new { @class = "form-signin" }))
    {
        @Html.AntiForgeryToken()
        @Html.ValidationSummary(true, "", new { @class = "text-danger" })
        @ViewBag.CaptchaMessage
        <h2 class="form-signin-heading">Please sign in</h2>

        @Html.LabelFor(model => model.Email, new { @class = "sr-only" })
        @Html.EditorFor(model => model.Email, new { htmlAttributes = new { @class = "form-control", placeholder = "Email address" } })
        @Html.ValidationMessageFor(model => model.Email, "", new { @class = "text-danger" })

        <label class="sr-only">Password</label>
            @Html.PasswordFor(model => model.Password, new { @class = "form-control", placeholder = "Password" })
            @Html.ValidationMessageFor(model => model.Password, "", new { @class = "text-danger" })

        <div class="g-recaptcha" data-sitekey="your site key"></div>

            <div class="checkbox">
                <label>
                    @Html.CheckBox("RememberMe", false) Remember me
                </label>
            </div>

            <button class="btn btn-lg btn-success btn-block" type="submit">Sign in</button>
    }
Server-side (Controller):
    [HttpPost]
    public ActionResult Login(User user, bool RememberMe)
    {
        var response = HttpContext.Request.Form["g-recaptcha-response"];
        string secretKey = "your secret key";
        var client = new WebClient();
        // get captcha verification result
        var verificationResultJson = client.DownloadString(string.Format("https://www.google.com/recaptcha/api/siteverify?secret={0}&response={1}", secretKey, response));
        // convert json to object
        var verificationResult = JsonConvert.DeserializeObject<CaptchaVerificationResult>(verificationResultJson);
        // process verification result
        if (!verificationResult.Success)
        {
            if (verificationResult.ErrorCodes.Count <= 0)
            {
                return View(user);
            }
            var error = verificationResult.ErrorCodes[0].ToLower();
            switch (error)
            {
                case ("missing-input-secret"):
                    ViewBag.CaptchaMessage = "The secret parameter is missing.";
                    break;
                case ("invalid-input-secret"):
                    ViewBag.CaptchaMessage = "The secret parameter is invalid or malformed.";
                    break;

                case ("missing-input-response"):
                    ViewBag.CaptchaMessage = "The captcha input is missing.";
                    break;
                case ("invalid-input-response"):
                    ViewBag.CaptchaMessage = "The captcha input is invalid or malformed.";
                    break;

                default:
                    ViewBag.CaptchaMessage = "Error occured. Please try again";
                    break;
            }
            return View(user);
        }
        else
        {
            // proceed form submission
			...
        }
    }
Model:
public class CaptchaVerificationResult
{
    [JsonProperty("success")]
    public bool Success { get; set; }

    [JsonProperty("error-codes")]
    public List<string> ErrorCodes { get; set; }
}
Reference
Google reCAPTCHA documentation
Google reCAPTCHA in ASP.NET MVC
-
Previous
Grab and parse data using Selenium WebDriver Part 3 - create parsing application using C# -
Next
Using regular expression in Javascript