Introduction
Angular is a framework for building client applications in HTML and either JavaScript or a language like TypeScript that compiles to JavaScript.
The framework consists of several libraries, some of them core and some optional. Typically, we build Angular applications by composing HTML templates in markup format.
Development steps:
- Build a project via cli
- Create component classes including view logic (.ts files, define properties) and they manage HTML templates(.html files) and component stylesheets(.css files)
- Add application logic in services such as HTTP requests, calculations. Call services from components
- Box components and services in modules, then import to the root module
- Configure routing and import to the root module
- Launch the app by bootstrapping the root module.
- Debug the project
Here is the outline of this tutorial:
- Fundamental knowledge
- Create a sample Angular project
- Create a component
- Create a model
- Create a service
- Create routing
- Add HTTP service
- Define module
Fundamentals
-
Module
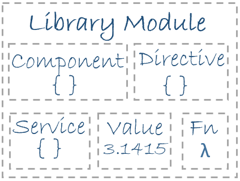
Angular apps are modular and Angular has its own modularity system called NgModules. Angular app has at least one root module, typically named AppModule. Within module, we can define components, directives, services…
-
Component
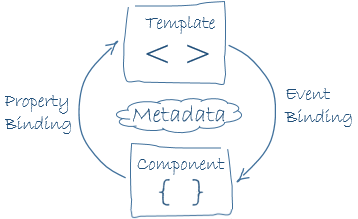
Component controls a patch of screen and it is a class. We define application logic inside component and component supports the view.
-
Template
Template is the view of component. It is a form of HTML that tells Angular how to render the component.
-
Metadata
Metadata decorates Angular class and it tells Angular how to process a class. In TypeScript, we attach metadata by using a decorator. E.g. here’s some metadata for a Component:
@Component({ selector: 'app-hero-list', templateUrl: './hero-list.component.html', providers: [ HeroService ], styleUrls: [] }) export class HeroListComponent implements OnInit { /* . . . */ }- selector: CSS selector that tells Angular to use this component
- templateUrl: module-relative address of this component’s HTML template
- providers: array of dependency injection providers for services that the component requires.
- styleUrls: relative address of stylesheets
-
Two way data binding
Data binding plays an important role in communication between a template and its component. Two way data binding represents the data value of input box in template syncs with the property of component automatically. Angular processes all data bindings once per JavaScript event cycle
Environment:
- Node.js v8+
- Visual Studio Code
Create a sample project via angular/cli
-
Install node.js
-
install angular/cli
npm install -g @angular/clior
npm install -g @angular/cli@latestor
npm install -g @angular/cli@8.0.6(angular v5)npm install -g @angular/cli@1.7.4(angular v5)npm update -g @angular/cli -
check version:
ng --versionor
ng -vor check package.json
-
create a new project
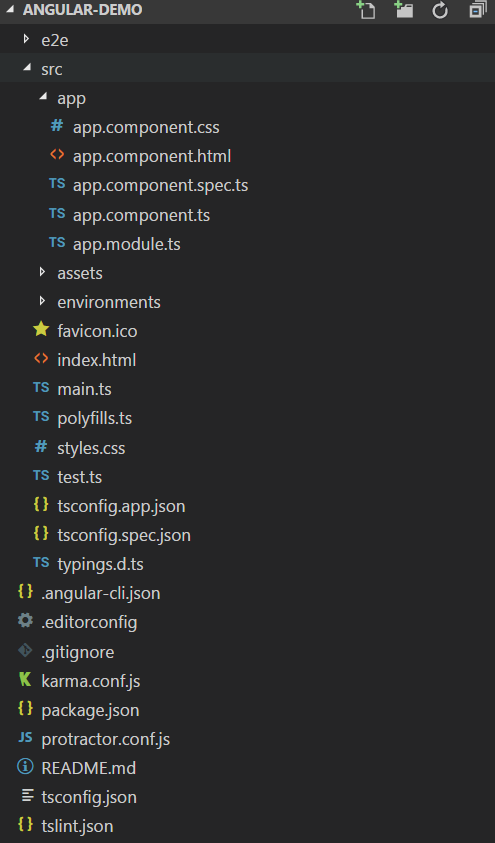
ng new angular-demo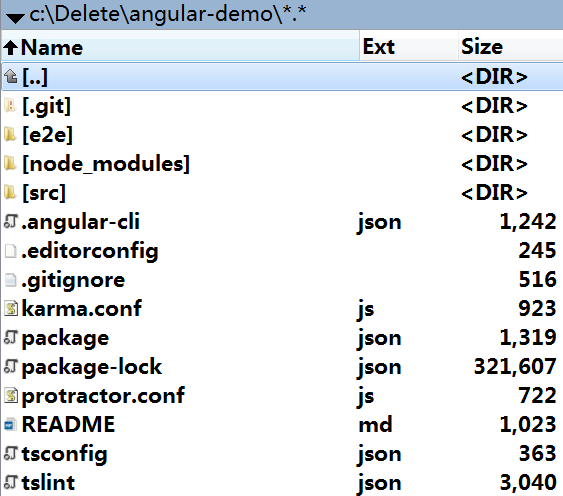
-
enter angular-demo folder,
ng serveorng serve --port 6000, by default, the port is 4200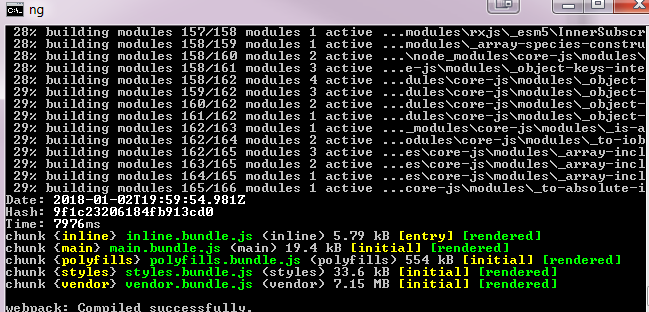
use configuration option:
ng serve --configuration=local -
open browser,
http://localhost:4200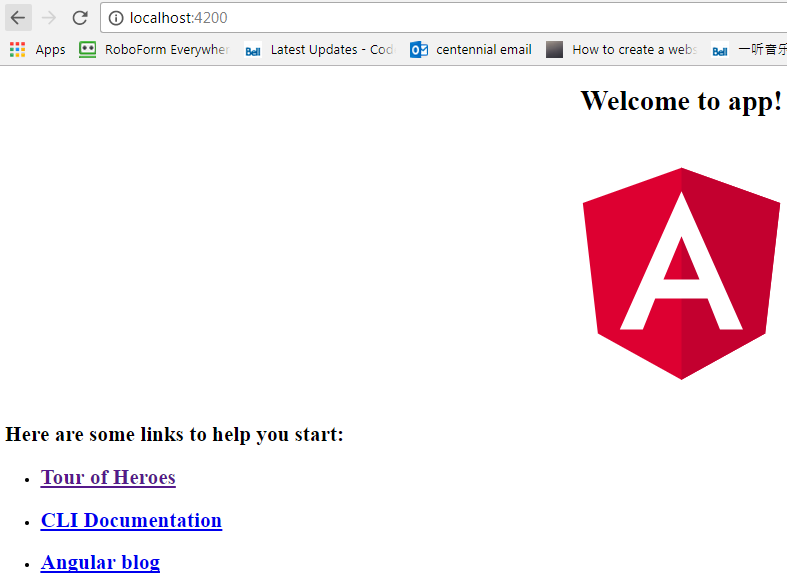
Create a component
-
create a new component heroes:
ng generate component heroes
or
ng generate component general-info --module app(app.module.ts) -
a new folder heroes will be created with components source code in it
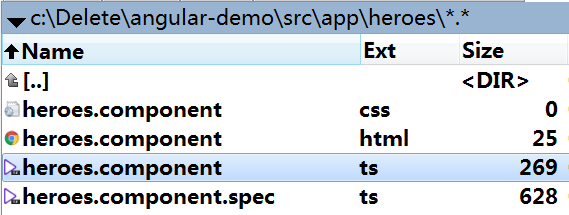
heros.component.ts
 import { Component, OnInit } from '@angular/core';

 @Component({
   selector: 'app-heroes',
   templateUrl: './heroes.component.html',
   styleUrls: ['./heroes.component.css']
 })
 export class HeroesComponent implements OnInit {
   constructor() { }

   ngOnInit() {
   }
 }
heroes.component.spec.ts
import { async, ComponentFixture, TestBed } from '@angular/core/testing'; import { HeroesComponent } from './heroes.component'; describe('HeroesComponent', () => { let component: HeroesComponent; let fixture: ComponentFixture<HeroesComponent>; beforeEach(async(() => { TestBed.configureTestingModule({ declarations: [ HeroesComponent ] }) .compileComponents(); })); beforeEach(() => { fixture = TestBed.createComponent(HeroesComponent); component = fixture.componentInstance; fixture.detectChanges(); }); it('should create', () => { expect(component).toBeTruthy(); }); }); -
app.module.ts will be updated
 import { BrowserModule } from '@angular/platform-browser';
 import { NgModule } from '@angular/core';


 import { AppComponent } from './app.component';
 import { HeroesComponent } from './heroes/heroes.component';


 @NgModule({
   declarations: [
     AppComponent,
     HeroesComponent
   ],
   imports: [
     BrowserModule
   ],
   providers: [],
   bootstrap: [AppComponent]
 })
 export class AppModule { }
Create a new model
`ng generate class hero`

hero.ts

export class Hero {
  id: number;
  name: string;
}
Create a new service
-
ng generate service services\hero
-
A new folder services will be created with service source code in it

hero.service.ts
 import { Injectable } from '@angular/core';

 @Injectable()
 export class HeroService {
   constructor() { }
 }
hero.service.spec.ts
 import { TestBed, inject } from '@angular/core/testing';
 import { HeroService } from './hero.service';

 describe('HeroService', () => {
   beforeEach(() => {
     TestBed.configureTestingModule({
       providers: [HeroService]
     });
   });

   it('should be created', inject([HeroService], (service: HeroService) => {
     expect(service).toBeTruthy();
   }));
 });
Create routing
ng generate module app-routing --flat --module=app--flatputs the file in src/app instead of its own folder.
--module=apptells the CLI to register it in the imports array of the AppModule.-
a app-routing.module.ts routing config file will be created and app.module.ts will be updated

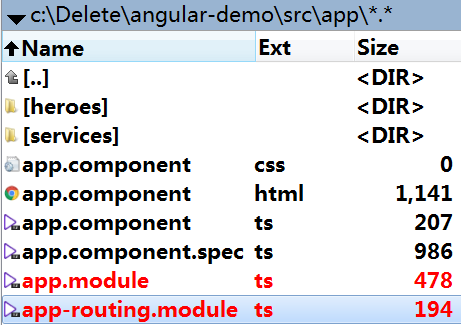
app-routing.module.ts
 import { NgModule } from '@angular/core';
 import { CommonModule } from '@angular/common';

 @NgModule({
   imports: [
     CommonModule
   ],
   declarations: []
 })
 export class AppRoutingModule { }
app.module.ts
 ...
 import { AppRoutingModule } from './app-routing.module';

 @NgModule({
   declarations: [
     AppComponent,
     ...
   ],
   imports: [
     ...
     AppRoutingModule
   ],
   providers: [],
   bootstrap: [AppComponent]
 })
 export class AppModule { }
Next, we will configure the router with Routes in the RouterModule
-
First, import
RouterModule, Routes. Also, remove the @NgModule.declarations array and CommonModule because we don’t declare components in a routing module .app-routing.module.ts
import { NgModule } from '@angular/core'; import { RouterModule, Routes } from '@angular/router'; @NgModule({ exports: [ RouterModule ] }) export class AppRoutingModule {} -
Add routes
A typical Angular Route has two properties:
path: a string that matches the URL in the browser address bar.
component: the component that the router should create when navigating to this route.e.g. we create route for HeroesComponent. We hope
localhost:4200/heroeswill invoke HeroesComponentapp-routing.module.ts
import { HeroesComponent } from './heroes/heroes.component'; ... const routes: Routes = [ { path: 'heroes', component: HeroesComponent } ]; - Add more routes
> `ng generate component hero-detail`
> `ng generate component dashboard`

update app-routing.module.ts

	import { DashboardComponent }   from './dashboard/dashboard.component';
	import { HeroDetailComponent }  from './hero-detail/hero-detail.component';
	...
	const routes: Routes = [
		...
		{ path: '', redirectTo: '/dashboard', pathMatch: 'full' }, // default route
		{ path: 'dashboard', component: DashboardComponent },
		{ path: 'detail/:id', component: HeroDetailComponent }, // parameterized route
	];
-
Then, initialize the router and start it listening for browser location changes.
app-routing.module.ts @NgModule({ … imports: [ RouterModule.forRoot(routes) ], })
-
Finally, add RouterOutlet in template pages. Open the AppComponent template replace the
element with a element. app.component.html
... <h1></h1> <nav> <a routerLink="/dashboard">Dashboard</a> <a routerLink="/heroes">Heroes</a> </nav> <router-outlet></router-outlet> ...<router-outlet>tells the router where to display routed views. Please note that RouterOutlet is already available to the AppComponent because AppModule imports AppRoutingModule which exported RouterModule.<routerLink>is the selector for the RouterLink directive that turns user clicks into router navigations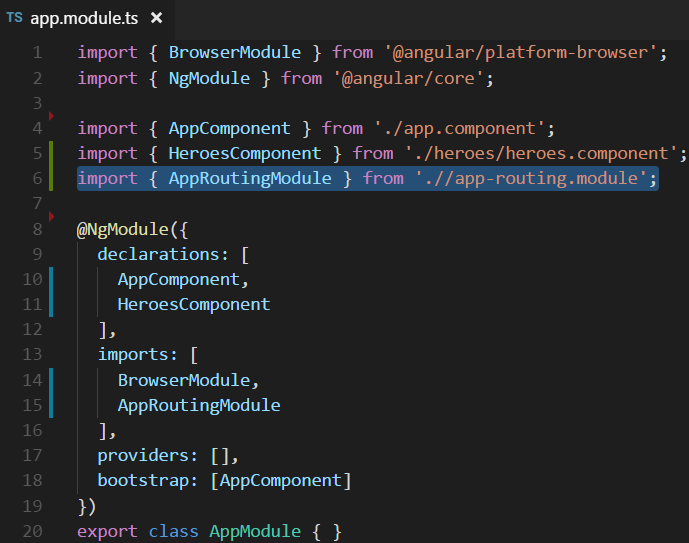

-
Grab parameter from router
update heroes.component.html
 ...
 <ul class="heroes">
   <li *ngFor="let hero of heroes">
     <a routerLink="/detail/">
       <span class="badge"></span>
     </a>
   </li>
 </ul>
 ...
because
detail/:idis routed to HeroDetailComponent, we need to parse data inside this componenthero-detail.component.ts
 ...
 import { ActivatedRoute } from '@angular/router';
 import { Location } from '@angular/common';

 @Component({
   ...
 })
 export class HeroDetailComponent implements OnInit {
     constructor(
       private route: ActivatedRoute,
       private heroService: HeroService,
       private location: Location
     ) {}
     ngOnInit(): void {
         this.getHero();
     }
     getHero(): void {
         const id = +this.route.snapshot.paramMap.get('id'); // + can convert string to number
         this.heroService.getHero(id)
         .subscribe(hero => this.hero = hero);
     }
     goBack(): void {
         this.location.back();
     }
 }
Add HTTP services
HttpClient is Angular’s mechanism for communicating with a remote server over HTTP.
-
Install the module by importing
HttpClientModuletoAppModuleapp.module.ts
import { HttpClientModule } from "@angular/common/http"; @NgModule({ declarations: [ ... // components list ], imports: [ BrowserModule ... , HttpClientModule ], } -
Use Http service to handle Http requests
After installing the module, the app will make requests to and receive responses from the HttpClient.
hero.service.ts
 import { Injectable } from "@angular/core";
 import { HttpClient, HttpHeaders } from "@angular/common/http";
 import { Observable } from 'rxjs/Observable';
 import { of } from 'rxjs/observable/of';

 @Injectable()
 export class HeroService {
     private heroesUrl = 'api/heroes';  // URL to web api

     constructor(
       private http: HttpClient,
       private messageService: MessageService) { }

     // get mock data
     //getHeroes(): Observable<Hero[]> {
     //  return of(HEROES);
     //}

     getHeroes (): Observable<Hero[]> {
       return this.http.get<Hero[]>(this.heroesUrl)
     }
 }
All HttpClient methods return an RxJS Observable of something (Hero array).
Please note
-
for angular 6.x, install
rxjs-compatpackagenpm install --save rxjs-compat
-
-
error handling
If things go wrong when we’re getting data from a remote server. The HeroService.getHeroes() method should catch errors and do something appropriate.
To catch errors, you “pipe” the observable result from http.get() through an RxJS catchError() operator. Then, extend the observable result with the .pipe() method and give it a catchError() operator
hero.service.ts
 import { catchError, map, tap } from 'rxjs/operators';
 ...
 export class HeroService {
 ...
     getHeroes (): Observable<Hero[]> {
       return this.http.get<Hero[]>(this.heroesUrl)
         .pipe(
             tap(heroes => this.log(`fetched heroes`)),
           	catchError(this.handleError('getHeroes', []))
         );
     }
     /**
      * Handle Http operation that failed. Let the app continue.
      * @param operation - name of the operation that failed
      * @param result - optional value to return as the observable result
      */
     private handleError<T> (operation = 'operation', result?: T) {
       return (error: any): Observable<T> => {

         // TODO: send the error to remote logging infrastructure
         console.error(error); // can log to other data repository

         // TODO: better job of transforming error for user consumption
         this.log(`${operation} failed: ${error.message}`); // display in the client

         // Let the app keep running by returning an empty result.
         return of(result as T);
       };
     }
 ...
 }
Here, getHeroes() still returns an Observable<Hero[]> (“an observable of Hero array”)
-
get data in component
HeroService returns an Observable<Hero[]> and we need to subscribe it and render it in view component.
... import { HeroService } from '../hero.service'; @Component({ ... }) export class HeroesComponent implements OnInit { heroes: Hero[]; constructor(private heroService: HeroService) { } ngOnInit() { this.getHeroes(); } getHeroes(): void { this.heroService.getHeroes() .subscribe(heroes => this.heroes = heroes); } } ... -
Add hero update support
update hero.service.ts
/** PUT: update the hero on the server */ updateHero (hero: Hero): Observable
{ return this.http.put(this.heroesUrl, hero, httpOptions).pipe( tap(_ => this.log(`updated hero id=${hero.id}`)), catchError(this.handleError ('updateHero')) ); } The HttpClient.put() method takes three parameters
- the URL
- the data to update (the modified hero in this case)
-
request options. e.g.
  const httpOptions = {
    headers: new HttpHeaders({ 'Content-Type': 'application/json' })
  };
Then, call save() method in hero detail component
hero-detail.component.html
<button (click)="save()">save</button>hero-detail.component.ts
save(): void { this.heroService.updateHero(this.hero) .subscribe(() => this.goBack()); } -
Add hero add support
update hero.service.ts
 /** POST: add a new hero to the server */
 addHero (hero: Hero): Observable<Hero> {
   return this.http.post<Hero>(this.heroesUrl, hero, httpOptions).pipe(
     tap((hero: Hero) => this.log(`added hero w/ id=${hero.id}`)),
     catchError(this.handleError<Hero>('addHero'))
   );
 }
Then, call add() method in hero detail component
hero-detail.component.html
 <input #heroName />
 <button (click)="add(heroName.value); heroName.value=''">add</button>
hero-detail.component.ts
add(name: string): void { name = name.trim(); if (!name) { return; } this.heroService.addHero({ name } as Hero) .subscribe(hero => { this.heroes.push(hero); }); } -
Add hero deletion support
update hero.service.ts
 /** DELETE: delete the hero from the server */
 deleteHero (hero: Hero | number): Observable<Hero> {
   const id = typeof hero === 'number' ? hero : hero.id;
   const url = `${this.heroesUrl}/${id}`;

   return this.http.delete<Hero>(url, httpOptions).pipe(
     tap(_ => this.log(`deleted hero id=${id}`)),
     catchError(this.handleError<Hero>('deleteHero'))
   );
 }
Then, call delete() method in hero list component
hero-detail.component.html
 <ul class="heroes">
   <li *ngFor="let hero of heroes">
     <a routerLink="/detail/">
       <span class="badge"></span>
     </a>
     <button class="delete" title="delete hero"
     (click)="delete(hero)">x</button>
   </li>
 </ul>
heroes.component.ts
delete(hero: Hero): void { this.heroes = this.heroes.filter(h => h !== hero); this.heroService.deleteHero(hero).subscribe(); } -
Add hero search support
update hero.service.ts
 /* GET heroes whose name contains search term */
 searchHeroes(term: string): Observable<Hero[]> {
   if (!term.trim()) {
     // if not search term, return empty hero array.
     return of([]);
   }
   return this.http.get<Hero[]>(`api/heroes/?name=${term}`).pipe(
     tap(_ => this.log(`found heroes matching "${term}"`)),
     catchError(this.handleError<Hero[]>('searchHeroes', []))
   );
 }
add a search component
ng generate component hero-search
update hero-search.component.html
 <input #searchBox id="search-box" (keyup)="search(searchBox.value)" />
 <ul>
     <li *ngFor="let hero of heroes$ | async" >
       <a routerLink="/detail/">

       </a>
     </li>
 </ul>
The $ is a convention that indicates heroes$ is an Observable, not an array.
The *ngFor can’t do anything with an Observable. But there’s also a pipe character (|) followed by async, which identifies Angular’s AsyncPipe.
The AsyncPipe subscribes to an Observable automatically so you won’t have to do so in the component class.update hero-search.component.ts
... import { Observable } from 'rxjs/Observable'; import { Subject } from 'rxjs/Subject'; import { of } from 'rxjs/observable/of'; import { debounceTime, distinctUntilChanged, switchMap } from 'rxjs/operators'; import { Hero } from '../hero'; import { HeroService } from '../hero.service'; @Component({ ... }) export class HeroSearchComponent implements OnInit { heroes$: Observable<Hero[]>; // declare heroes$ as an Observable private searchTerms = new Subject<string>(); constructor(private heroService: HeroService) {} // Push a search term into the observable stream. search(term: string): void { this.searchTerms.next(term); } ngOnInit(): void { this.heroes$ = this.searchTerms.pipe( // wait 300ms after each keystroke before considering the term debounceTime(300), // ignore new term if same as previous term distinctUntilChanged(), // switch to new search observable each time the term changes switchMap((term: string) => this.heroService.searchHeroes(term)), ); } }- A Subject is both a source of observable values and an Observable itself. You can subscribe to a Subject as you would any Observable.
- You can also push values into that Observable by calling its next(value) method as the search() method does.
- debounceTime(300) waits until the flow of new string events pauses for 300 milliseconds before passing along the latest string. You’ll never make requests more frequently than 300ms.
- distinctUntilChanged ensures that a request is sent only if the filter text changed.
- switchMap() calls the search service for each search term that makes it through debounce and distinctUntilChanged. It cancels and discards previous search observables, returning only the latest search service observable.
Define feature modules
We could import and declare all components in the root module. Or, we can define feature modules to group and encapsulate components, then import to the root module.
A typical root module
import { NgModule }      from '@angular/core';
import { BrowserModule } from '@angular/platform-browser';
import { AppComponent } from './app.component';

@NgModule({
  imports:      [ BrowserModule ],
  providers:    [],
  declarations: [ AppComponent ],
  exports:      [],
  bootstrap:    [ AppComponent ]
})
export class AppModule { }
- declarations - the view classes that belong to this module. Angular has three kinds of view classes: components, directives, and pipes.
- exports - the subset of declarations that should be visible and usable in the component templates of other modules.
- imports - other modules whose exported classes are needed by component templates declared in this module.
- providers - creators of services that this module contributes to the global collection of services; they become accessible in all parts of the app.
- bootstrap - the main application view, called the root component, that hosts all other app views. Only the root module should set this bootstrap property.
Create a feature module
Import feature module to root module
Make release
Create a build: ng build
build in production: ng build --prod
if there are virtual directory stock: ng build --base-href /stock/ --prod
References
Debug the project
-
Install
Debugger for Chromein visual studio code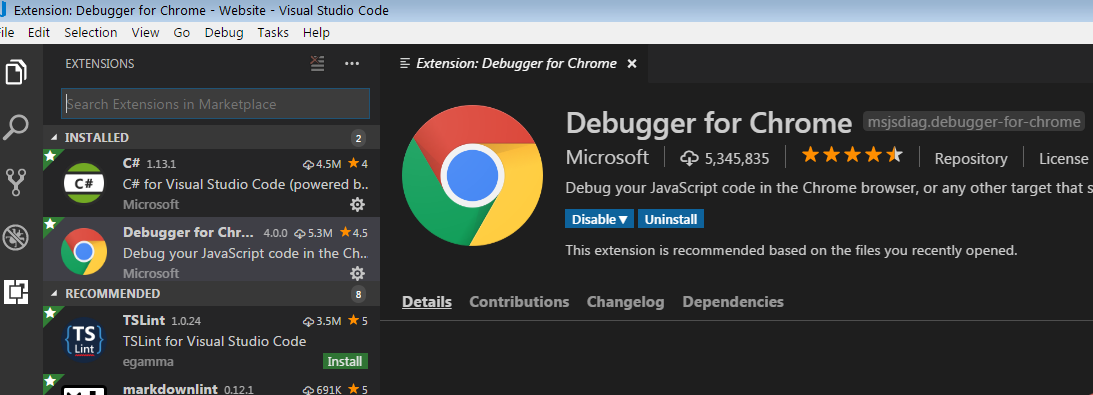
-
Create
.vscode/launch.jsonfile to enable debugger{ "version": "0.1.0", "configurations": [ { "name": "Launch localhost", "type": "chrome", "request": "launch", "url": "http://localhost:4200", "webRoot": "${workspaceFolder}/wwwroot" }, { "name": "Launch index.html (disable sourcemaps)", "type": "chrome", "request": "launch", "sourceMaps": false, "file": "${workspaceFolder}/index.html" }, ] }Here, we specify visual studio to open a new Chrome window (request=launch) for debugging purpose.
-
In visual studio code, we start the serve by Terminal >
ng serveand add some debug breakpoints
-
Then, click the
Start debuggingbutton in debug view. A chrome will be opened automatically, press f12 to open developer tools, then refresh the page.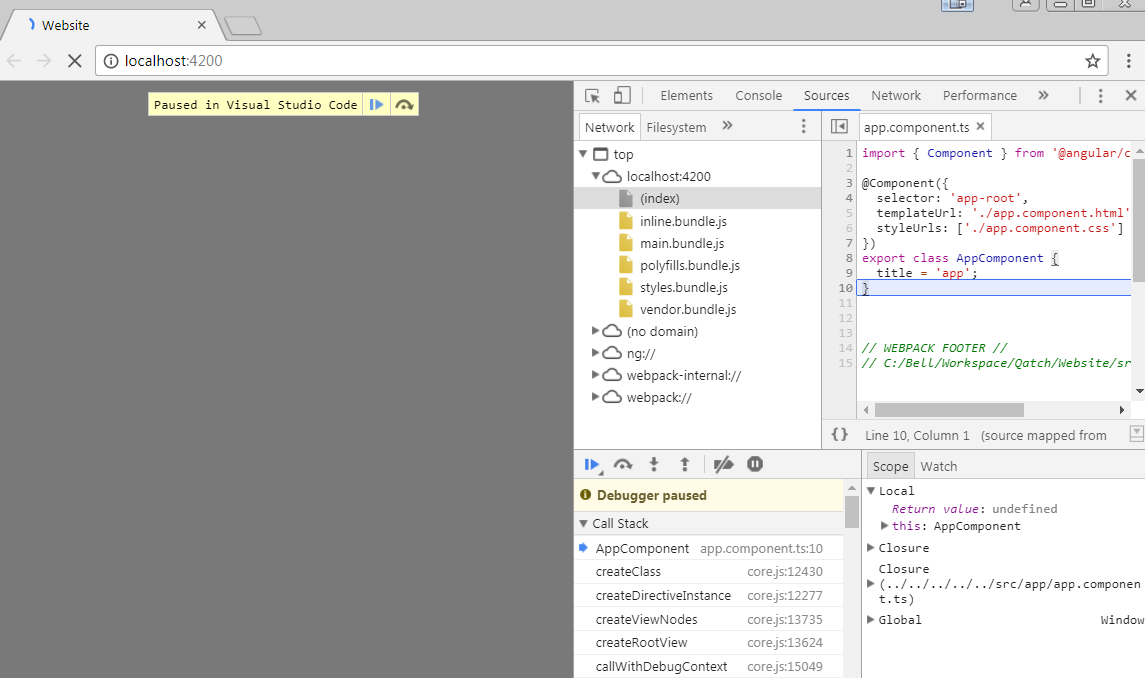
Install lodash
npm install --save lodash
npm install --save @types/lodash
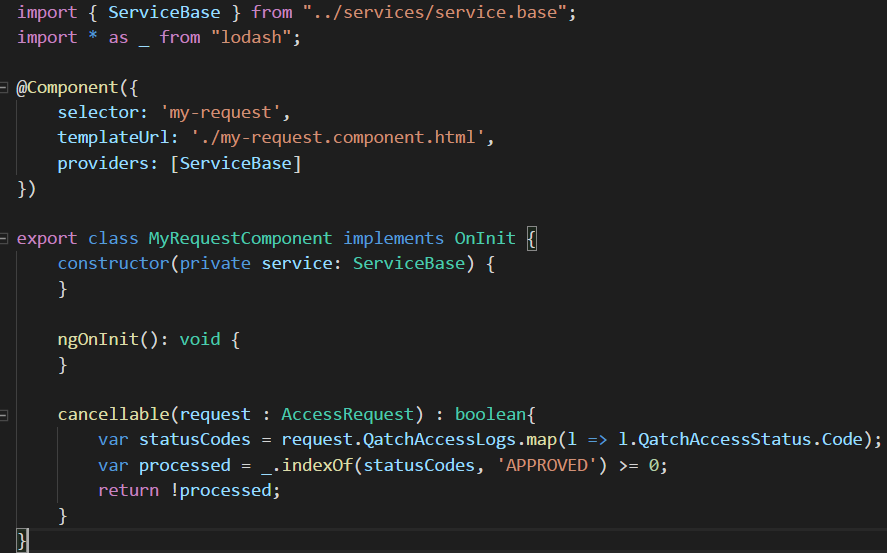
Then, in your .ts file:
import * as _ from "lodash";
Next, simply call _.<lodash_function>()
Install moment.js
npm install moment --save
npm install @types/moment --save
or
npm install moment-timezone --save (will install moment automatically)
npm install @types/moment-timezone --save
in angular-cli.json (Angular 5+)
{
  ...
  "apps": [
     ...
     "scripts": [
        "../node_modules/moment/min/moment.min.js"
     ]
     ...
  ]
  ...
}
in angular.json (Angular 6+)
{
  "projects": {
    "Web": {
      ...
      "architect": {
        	...
            "scripts": []
          },
          ...
        },
        "serve": {
          ...
        },
        "test": {
        	...
            "styles": [
              "src/styles.scss",
              "./node_modules/bootstrap/dist/css/bootstrap.css"
            ],
            "scripts": [
              "../node_modules/moment/min/moment.min.js"
            ],
            "assets": [
              "src/favicon.ico",
              "src/assets"
            ]
          }
        },
        ...
      }
    }
  },
  ...
}
in my-component.component.ts
import { Component } from '@angular/core';
import * as moment from 'moment';
import 'moment-timezone';

@Component({
  selector: 'my-component',
  templateUrl: './my-component.component.html',
  styleUrls: ['./my-component.component.css']
})
export class MyComponent {

  constructor() {
    let now = moment();
    console.log('hello world', now.format());
    console.log(now.add(7, 'days').format());

    let easternNow = moment().tz('America/New_York');
  }
}
Add scss support
-
Open angular-cli.json, add
styleExt, add styles{ ..., "project": { "name": "website" }, "apps": [ ..., "styles": [ "styles.css", "covalent-theme.scss" ] ], ..., "defaults": { "styleExt": "scss", "component": {} } } -
Add external style > open src\styles.css
/* You can add global styles to this file, and also import other style files */ @import “~@angular/material/prebuilt-themes/indigo-pink.css”; @import ‘./assets/css/xxx.min.css’;
-
Add boostrap:
npm install --save bootstrapway1: add in global root - styles.css / styles.scss
@import '../node_modules/bootstrap/dist/css/bootstrap.min.css';way2: add in .angular-cli.json or angular.json:
 "styles": [
   "src/styles.scss",
   "./node_modules/bootstrap/dist/css/bootstrap.css"
 ],
Create pipe
we can write a custom pipe by implementing PipeTransform interface
for example, a pipe to filter employee object via factId property
-
write employee-fact-filter.pipe.ts
 import { PipeTransform, Pipe } from "@angular/core";
 import { Employee } from "../models/employee.model";

 @Pipe({name: 'employeeFactFilter'})
 export class EmployeeFactFilterPipe implements PipeTransform{
     transform(value: Employee, factId : number) : Employee {
         if (factId == null) value.TblEmployeeFactRel = [];
         else value.TblEmployeeFactRel = value.TblEmployeeFactRel.filter(fact => fact.FactId == factId);
         return value;
     }

 }
Please note
- A pipe is a class decorated with pipe metadata. the name must by camel case e.g.
employeeFactFilterinstead of separated by comma e.g.employee-fact-filter(wrong) - the transform method accepts an input value followed by optional parameters and returns the transformed value. There will be one additional argument to the transform method for each parameter passed to the pipe. Your pipe has one such parameter: the exponent.
- A pipe is a class decorated with pipe metadata. the name must by camel case e.g.
-
include the pipe in the declarations array of the AppModule,
app.module.tsimport { BrowserModule } from '@angular/platform-browser'; import { NgModule } from '@angular/core'; import { FormsModule } from '@angular/forms'; import { HttpModule } from '@angular/http'; import { AppComponent } from './app.component'; import { EmployeeFactFilterPipe } from './employee-fact-filter.pipe.ts'; @NgModule({ declarations: [ AppComponent, EmployeeFactFilterPipe ], imports: [ BrowserModule, FormsModule, HttpModule ], providers: [], bootstrap: [AppComponent] }) export class AppModule { }Please note if we choose to inject your pipe into a class, we must provide it in the providers array of your NgModule.
-
In template, we use this custom pipe:
<tr *ngFor=”let factRel of (employee | employeeFactFilter: factId).GetFactRelByDate(from, to)”> </tr>
If we use multiple parameters, it will be defined like
@Pipe({name: 'uselessPipe'})
export class uselessPipe implements PipeTransform {
  transform(value: string, before: string, after: string): string {
    let newStr = `${before} ${value} ${after}`;
    return newStr;
  }
}
call it like that:
Install material icon
npm install material-design-icons
install jquery
way 1, add new lib to global scope
npm install --save jquery
npm install popper.js --save
npm install bootstrap --save
angular.json
"architect": {
        "build": {
          ...,
            "scripts": [
			  "node_modules/jquery/dist/jquery.slim.js",
			  "node_modules/popper.js/dist/umd/popper.js",
			  "node_modules/bootstrap/dist/js/bootstrap.js"
              ...
            ]
          },
		"styles": [
		  "node_modules/bootstrap/dist/css/bootstrap.css",
		  "src/styles.css"
		],
in component:
declare var $: any;
ngOnInit() {
   $(document).ready(function() {
     alert('I am Called From jQuery');
   });
}
way2, add typings to global libraries
npm install –save jquery
npm install –save @types/jquery
in component:
import * as $ from 'jquery';

ngOnInit() {
   $(document).ready(function() {
     $('#my-button').click(doSomething());
 });
}
FAQ
Code scaffolding Run ng generate component component-name to generate a new component. You can also use ng generate directive|pipe|service|class|guard|interface|enum|module.
Running unit tests Run ng test to execute the unit tests via Karma.
Running end-to-end tests Run ng e2e to execute the end-to-end tests via Protractor.