This article introduces GitFlow and GitHub Flow by which we can smartly use Git to integrate codes within team members. It presents two models to manage changes and merge codes. They focus on project development, continuous integration and release. These models origin from Git branching model and feature-oriented. They are based on Git fundamental knowledge such as branch, merge, rebate, squash.
Please read previous posting for a quick review of Git basic conceptions.
GitFlow model
introduction
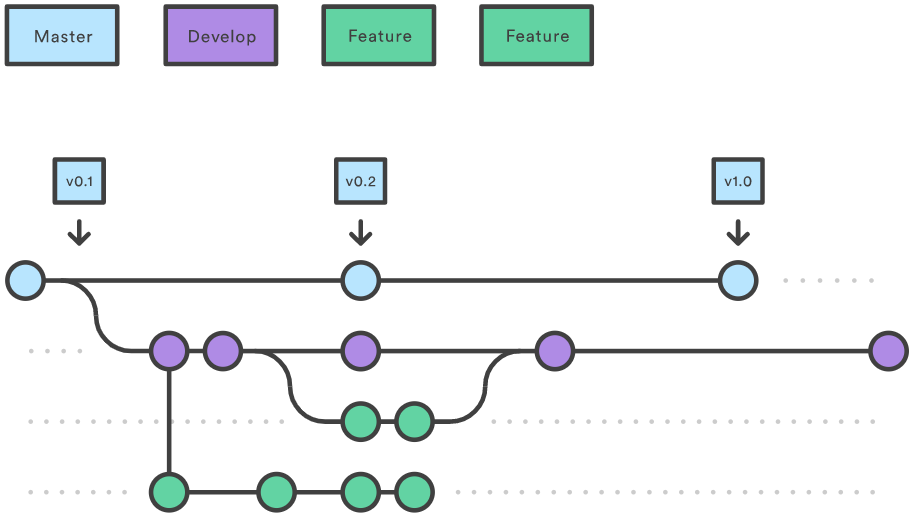
Gitflow model uses two branches to record the history of the project and multiple feature branches to develop new feature requirements.
- master branch stores the official release history
- develop branch serves as an integration branch for features
- feature branch saves development deliverables
The purpose of separation is to give a clear, highly-focused purpose to each branch. There is no technical distinction between master branch, develop branch and feature branches.
Master branch
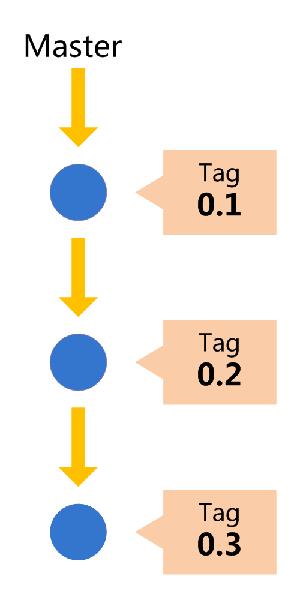
Each project should have one and only one master branch. All releases should be made only via the master branch. Master branch should always be clean and stable. All development and intermediate operations should never happen in the master branch. This is production branch.
Develop branch
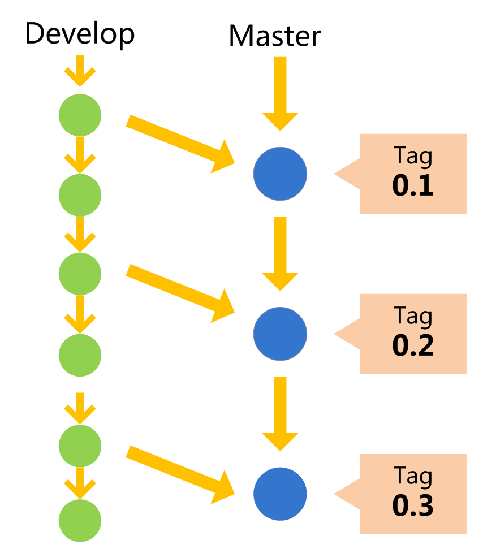
Develop branch is the integration branch. It reflects the state of latest delivered development changes. This is where any automatic nightly builds (continuous integration) are built from. Develop branch is the fundamentals of master branch. It shouldn’t contains any broken code as well.
Feature branch
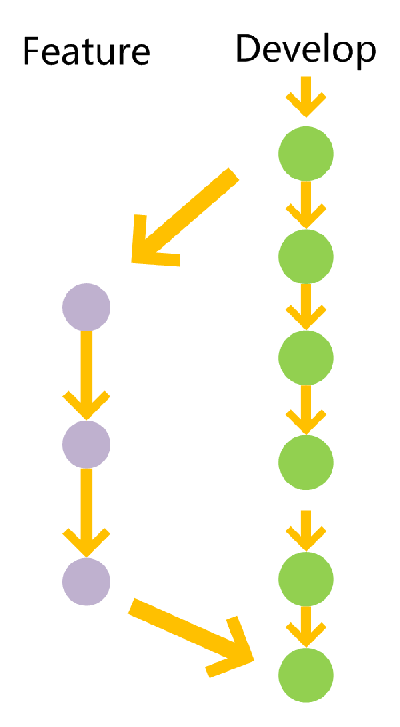
Feature branch includes all development activities such as new features, fixes or special releases. All of them should take place in a dedicated branch - feature branch instead of the master or develop branch. This encapsulation makes it easy for multiple developers to work on a particular feature without disturbing the main codebase.
Feature branch is temporary branch and it is created just for complete a specific requirement. After completion, feature branch should be merged to develop branch and deleted.
Workflow##
Gitflow is a utility encapsulates branching model of Git. It is very well suited to collaboration and scaling the development team. It is essentially a Git extension including a set of commands to simplify the integration operations.
Some graphical Git clients such as SouceTree, GitKraken, smartgit have built-in support to GitFlow.
Here are major steps of GitFlow:
-
Create a new repo with
masterbranch -
Create
developbranch based onmasterbranchcreate develop branch from master branch
git checkout -b develop mastermerge new changes from master to develop
git checkout developgit merge master -
Create a dedicated branch for each new feature
**create a new feature branch from develop branch **
git checkout -b <feature-branch> developnaming convention: andy-api-jira-1235
-
Do some development in feature branch.
-
Constantly pull changes from remote repo/master and merge to feature branch
git pull origin <feature-branch>git checkout <feature-branch>pull changes from develop branch to feature branch
git merge develop <feature-branch> -
Merge changes from feature branch to
developbranchfeature is completed, add commits and merge/rebate changes
switch to feature branch:
git checkout feature-branchstage changes:
git add --allcommit changes:
git commit --verbose–verbose option will list all diff result
push feature branch to remote git server:
git push origin <feature-branch>switch to develop branch:
git checkout developpull possible changes of other team members for develop branch:
git pull origin developmerge changes from feature branch:
git merge --no-ff <feature-branch>git merge develop <feature-branch>git pull origin <feature-branch>–no-ff: disable the default fast-forward merge
delete feature branch(optional):
git branch -d <feature-branch>feature is not completed, stash
git stashgit checkout other-feature-branchdo some development in other feature branch, then switch back to previous feature branch
git checkout feature-branchgit stash popCreate a version tag
git tag -a 1.2.1 -
Continuous integration and beta release in develop branch
-
Merge changes from develop branch to master branch and make a formal release
merge changes
switch to master branch:
git checkout mastermerge changes from develop branch:
git merge --no-ff develop–no-ff: disable the default fast-forward merge
Create a version tag
git tag -a 1.2
Summary
GitFlow is a classic model and it has a straightforward structure to separate the release and continuous integration.
However, there are some drawbacks for this model.
- It is sort of complex and we have to maintain two long-term branches: master and develop. And we have to switch these two branches constantly and it is annoying. There are separate release branch and hotfix branch in serious GitFlow and these conceptions make the model even complex.
- Since master branch is generated from develop branch. There is no big differences between them and we really don’t have to maintain two branches in the sense.
GitHub flow
GitHub Flow is proposed by GitHub.com. It is a lightweight, branch-based workflow that supports teams and projects where deployments are made regularly. It could be regarded as a simplified version of GitFlow model.
Introduction
This model has two types of branch:
- master branch stores the official release history and also serves as continuous integration
- feature branch saves development deliverables
The main concepts in GitHub Flow are:
- anything in the master branch is deployable
- any new feature or hotfix requirement should be put into dedicated branches
- when we need feedback or help, or we think the branch is ready for merging, open a pull request
- after someone else has reviewed and signed off the feature, we can merge it into master
- Once it is merged and pushed to “master” branch, we should deploy immediately
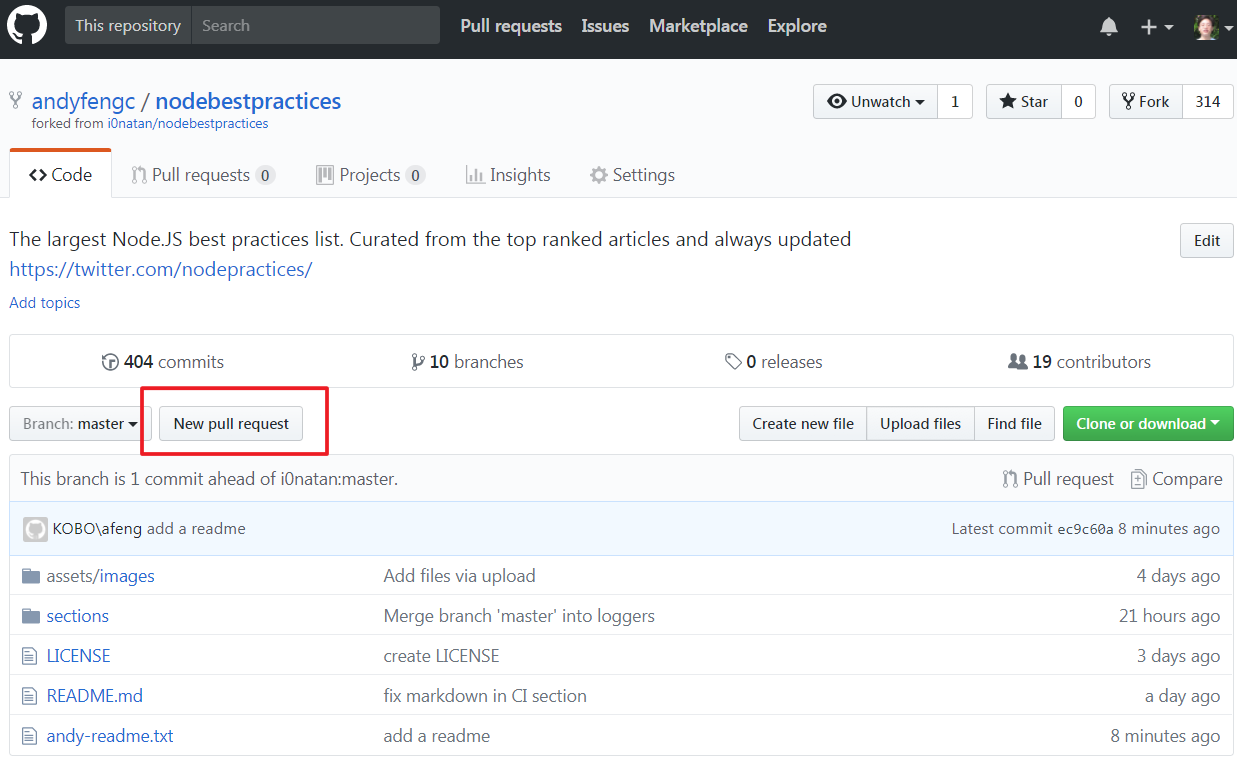
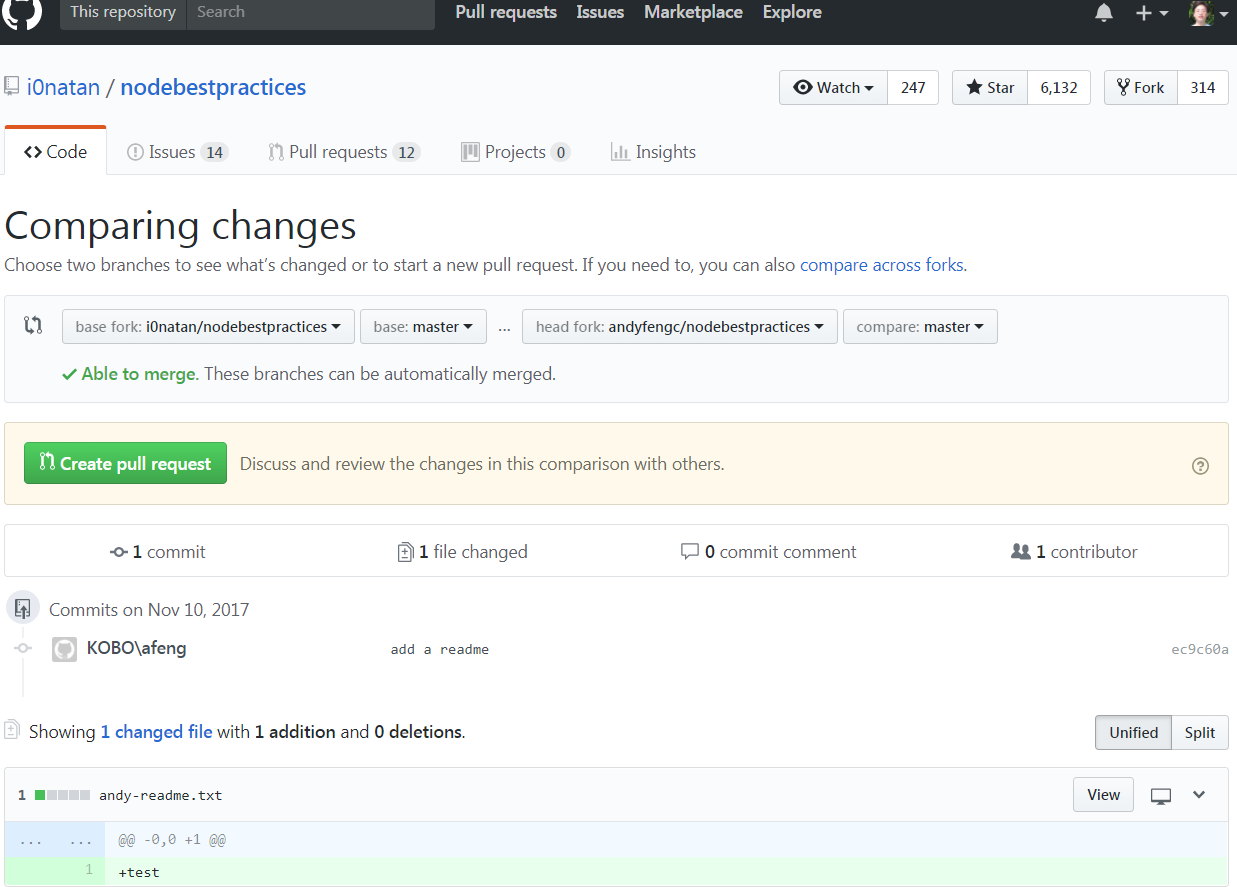
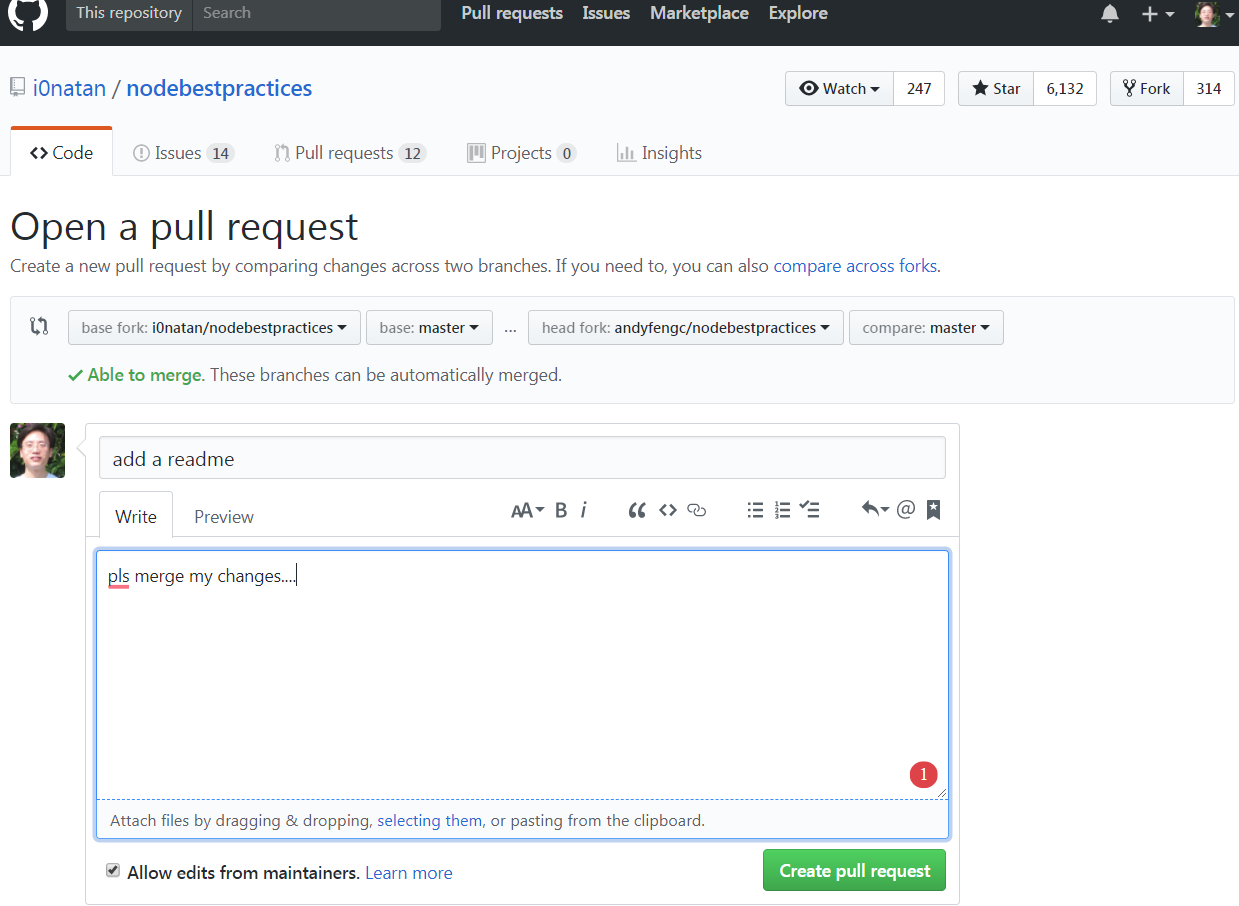
As we see, instead of directly merging changes from feature branch to develop/master branch, we open a pull request to master branch in GitHub Flow model. This behaviour encourages others discuss and review the changes. Afterwards, this model let us accept and merge changes.
Workflow
Here are major steps of GitHub Flow:

-
Create a new repo with master branch
-
Create a dedicated branch for each new feature or hotfix
**create a new feature branch from master branch **
git checkout -b <feature-branch> develop -
Do some development in feature branch
-
Constantly pull changes from remote repo/master and merge to feature branch
git pull origin <feature-branch> -
Merge changes from feature branch to develop branch
feature is completed, add commits
switch to feature branch:
git checkout feature-branchstage changes:
git add --allcommit changes:
git commit --verbose–verbose option will list all diff result
feature is not completed, stash
git stashgit checkout other-feature-branchdo some developmentgit checkout feature-branch`git stash pop’
Create a version tag
git tag -a 1.2.1 -
Open a pull request to master branch
-
Pull request will invite other developers to discuss and review our commits.
During the review process, we can keep committing new changes in feature branch. If someone comments that we forgot to do something or if there is a bug in the code, we can fix it in feature branch and push up the change. GitHub will show our new commits and any additional feedback.
-
Continuous integration in master branch
-
Merge changes from feature branch to master branch and make a release
As long as the commit is verified, we can accept the merge to master branch. Then, move on to make a release.
**delete feature branch: **
git branch -d <feature-branch>Create a version tag
git tag -a 1.2
Summary
GitHub Flow model is a simpler alternative. This model has only feature branches and a master branch. This is very simple and clean. It is also suitable for continuous integration. Master branch is the unique branch to integrate code and make release.
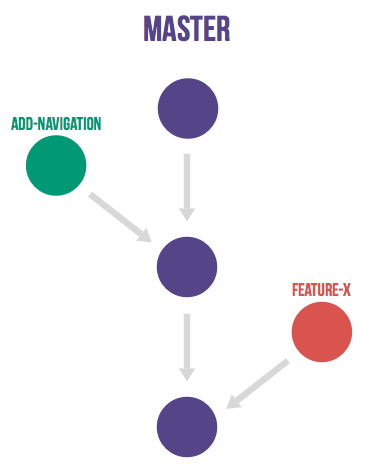
However, the drawback is the merge is only done after other developers view and accept the pull request. The merge might be behind the schedule if the pull request not accepted.
FAQ
How to cache changes when switching branches?
Typically, when we switch branches, we first commit changes before switching. A new commit point is created in the git log at the moment.
However, we somehow hope to cache current work instead of committing dirty changes.
There are two ways:
-
Use
stashstash the changes in current branch:
git stashswitch to another branch and work on it:
git checkout -b <another-branch>pop out the cached changes:
git stash pop -
Still use
commitcommit dirty changes as usual:
git commitswitch to another branch and work on it:
git checkout -b <another-branch>complete another branch and merge changes to trunk branch:
git commitgit mergetrunck branch represents main branch and it could be master or develop branch in GitFlow model and master branch in GitHub Flow model
switch back to previous branch and proceed the previous development:
git checkout <feature-branch>commit the changes after completing development:
git commitsquash last dirty commit and new commit when merge to develop branch:
git checkout developgit merge --squash <feature-branch>squash is an option to combine multiple commits to one commit when merging changes
or squash last dirty commit and new commit within branch:
git rebase -i
How to tag release versions?
Tagging in Git is a great way to denote specific release versions of our code. We can create a tag with the current state of the branch we are currently on.
There are two ways to create tags:
-
the Git command line
git tag <tagname>Please note that when pushing to our remote repo, tags are NOT included by default. We have to explicitly specify that we want to push tags to remote repo:
Push all tags:
git push origin --tagsPush specified tag:
git push origin <tagname>list all tags
git tagdelete a tag
git tag -d <tagname> -
Github’s web interface
- Click the releases link on our repository page

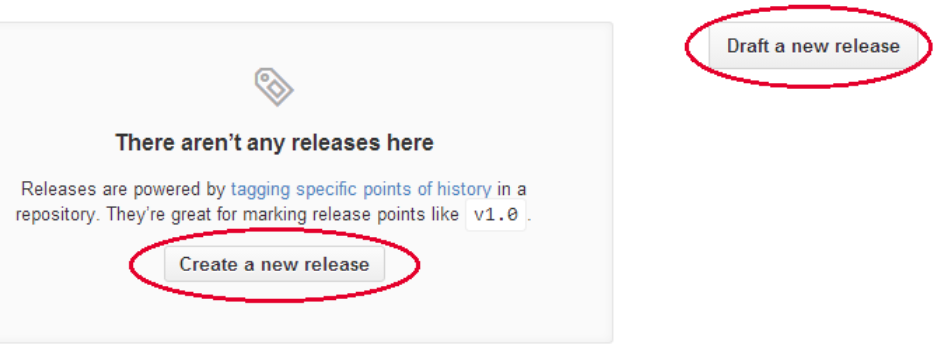
- Click on Create a new release or Draft a new release
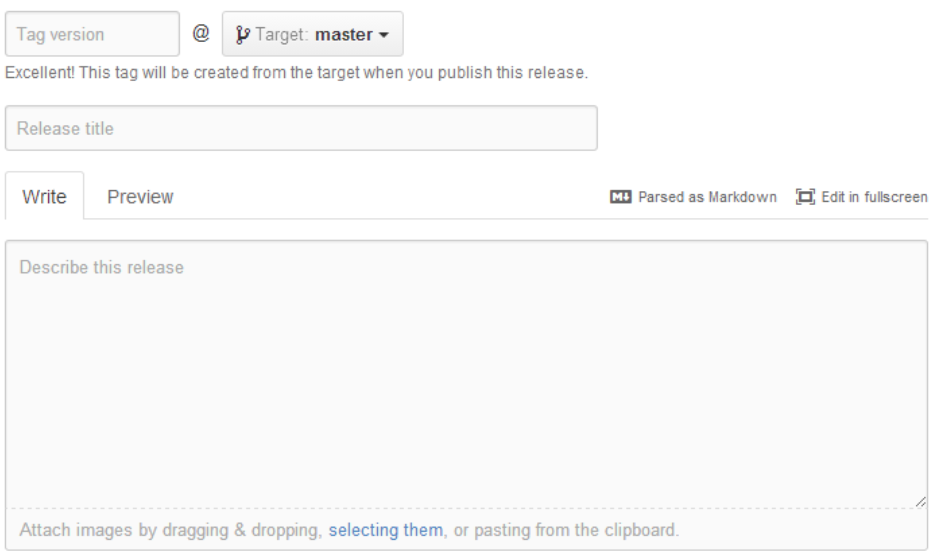
- Fill out the form fields, then click Publish release at the bottom

- After create tags on GitHub, we can fetch it into our local repository or pull it
- Click the releases link on our repository page
References
A successful Git branching model
Understanding the Git Workflow
http://www.cppblog.com/deercoder/archive/2011/11/13/160007.aspx
-
Previous
Git fundamentals - branch, fork, stash, merge, rebate, squash -
Next
SQL Server Reporting Services Tutorial 1 - Introduction