This article introduces Git fundamental knowledge including branch, fork, stash, merge, rebate. It explains major conceptions of Git branching model and workflow for each commands. These commands are required for next posting - best practice for team development via Git.
Outline
- Basic commands review
- set up git
- create local repository
- stage file(s)
- commit file(s)
- sync remote repository and local repository
- display git information
- discard changes
- Branch
- Introduction
- Workflow
- Fork
- Introduction
- Workflow
- fork vs clone
- fork vs branch
- Stash
- Introduction
- Workflow
- Merge, Rebate, Squash
Basic commands review
This is the git model:
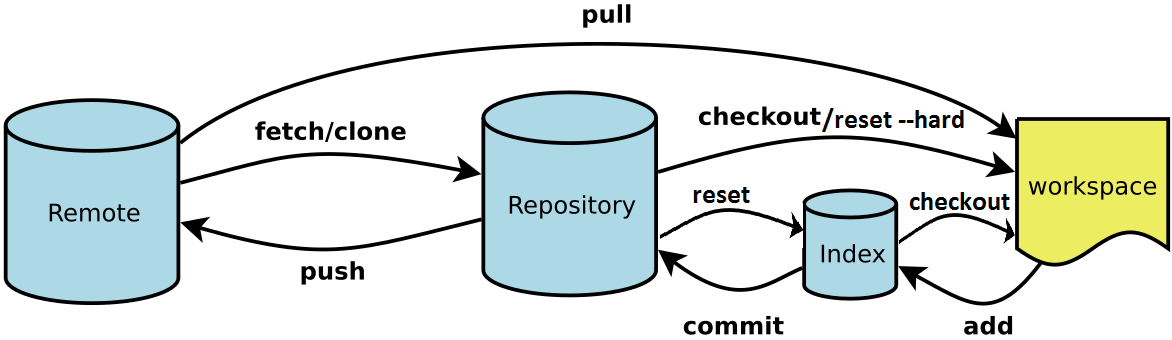
Remote represents the remote repository
Repository is the local repository
workspace is the active branch we currently working on
Index is the staging area
Here are some basic Git commands:
Setup git
display git configuration
git config --list
edit git configuration
git config -e [--global]
setup user commit information
git config [--global] user.name "Andy Feng"
git config [--global] user.email "andy@email.com"
Create local git repository
Setup new git repository
mkdir new-repository
cd new-repository
git init
touch readme
git add readme
git commit -m "first commit"
git remote add origin https://github.com/new-repository.git
origin is an alias of remote repository.
git push -u origin master
master is the name of main branch in local repository it is equivalent to
git push -u origin/master master
Setup existing git repository
cd existing-repository
git remote add origin https://github.com/existing-repository.git
git push -u origin master
Clone a remote repository
git clone https://github.com/existing-repository.git
Create upstream tracking between remote branch and local branch
git branch --set-upstream-to origin/master master
Stage files to Index
stage specified files
git add [file1] [file2]...
stage specified directory
git add [dir]
**stage all files **
git add .
git add -A
delete specified files and stage them
git rm [file1] [file2]...
Commit files to local repository
commit all staged files to local repository
git commit -m [message]
commit specified staged files to local repository
git commit [file1] [file2] ... -m [message]
display all diff information of commits
git commit -v
Sync remote repository and local repository
Pull all remote changes
git fetch origin
origin is the name of remote repository. As a convention, we usually name it as
origin
Pull all remote changes and merge into a local branch
git pull <remote-branch> <local-branch>
e.g. git pull origin master
Push changes of a local branch to remote repository
git push <remote-branch> <local-branch>
Push all local branches to remote repository
git push <remote-branch> --all
Display git information
Display all changed files before commit to local repository
git status
Display the difference between workplace and Index
git diff
** List git commits **
Get the commit history of current branch
git log
Get the commit history of recent n commits
git log -n
Get the commit history and all files of current branch
git log --state
search git commits
git log -S <keyword>
Display the changed content of commit
git show
git show <commit>
display a specified commit
Display all configured remote repositories
git remote -v
Discard changes
Restore files to Workspace
Restore specified file from staged area (Index)
git checkout <file>
Restore all files from staged area
git checkout .
Restore from committed files
git checkout <commit> <file>
restore operation still keeps the staged or committed files. But the same files will be overwritten by the restored ones and new changes of files will lose. Status of file is not changed for this operation.
Reset files from commits
Reset specified file from local repository to staged area (Index) until last commit
git reset <committed-file>
Reset from local repository to staged area until specified comit
git reset <commit>
Reset both staged area and workspace until last commit, all changes in workspace lost
git reset --hard
Reset both staged area and workspace until specified commit, all changes in workspace lost
git reset --hard <commit>
Reset to specified commit, and create a new commit for this reset
git revert <commit>
Reset to specified commit, and keep all changes in workspace
git reset --keep <commit>
reset operation essentially rollbacks files from previous commit status. by default, only the status of file is changed from committed to staged. New changes of files still keep. –hard option: both the status of file is reset and the changes of file lose –keep option: only reset the status of file but keep the changes of file
e.g. discard all local changes and reset master branch:
switch the repo to the master branch: git checkout master
pull the latest commits: git fetch origin
reset the repo’s local copy of master branch to match the latest version: git reset --hard origin/master
Branch
Introduction
A branch represents an independent line of development. When a git repository is created, a default master branch is created. We can create new branches anytime.
In Git, branch is a part of our everyday development process. When we want to add a new feature or fix a bug — no matter how big or how small — we spawn a new dedicated branch to encapsulate our changes. Then, we clean up the feature’s history before merging it into the main branch.
The benefit is, branch makes sure that unstable code is never committed to the main code base and keep development activities organized.
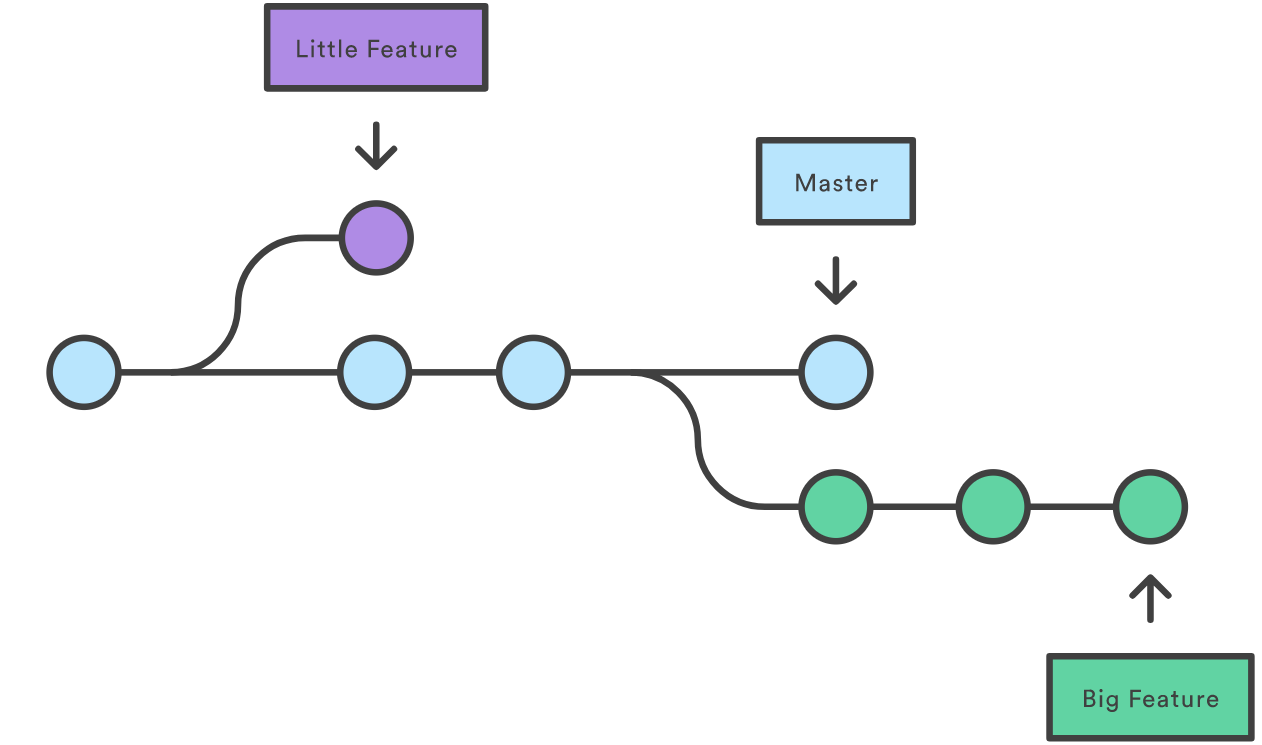
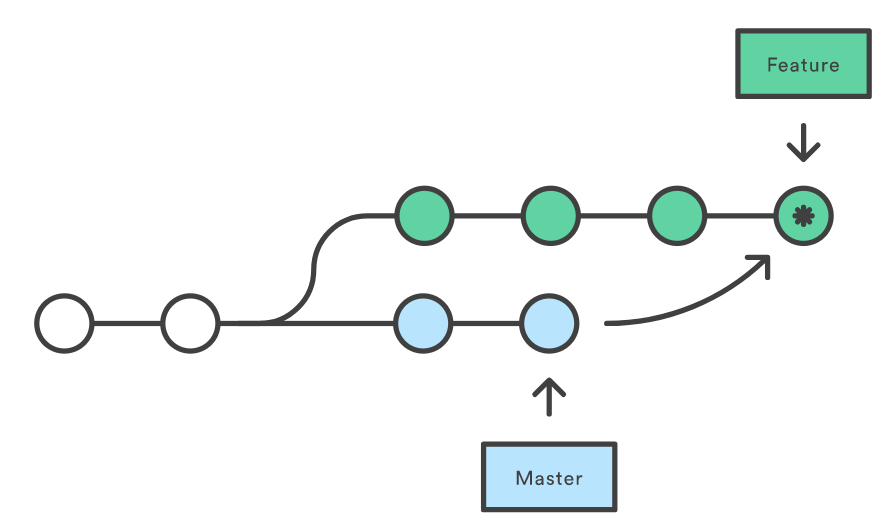
For example, the diagram above visualizes a repository with two isolated lines of development, one for a little feature, and one for a big feature. By developing them in branches, it’s not only possible to work on both of them in parallel, but it also keeps the main master branch free from questionable code.
Here are some common commands:
List all branches in local repository
git branch
List all branches in remote repository
git branch -r
List all local and remote branches
git branch -a
Create a new branch called <branch>. This does not check out the new branch.
git branch `<new-branch>
Switch to another branch
git checkout <existing-branch>
Create and switch to another branch
git checkout -b <new-branch>
-b flag tells Git to create the branch if it doesn’t already exist.
Delete a branch
git branch -d <branch>
This is a “safe” operation in that Git prevents you from deleting the branch if it has unmerged changes.
git branch -D <branch>
This is a “force” delete operation and it will permanently delete the specified branch, even if it has unmerged changes.
Rename the current branch to another name <new-branch>.
git branch -m <new-branch>
push a branch to remote server
push a branch to remote server
git push origin <branch>
push “master” branch to remote server
git push origin master
delete a remote branch
git push origin --delete [branch-name]
Workflow
Here is how Git branching model works:
-
create a new branch for each new feature/fix
git checkout -b <new-branch> -
work on it
-
merge it back to Master when done
git checkout mastergit merge <branch>fix conflicts if has any
git commitor
git merge <branch> master -
push master branch to remote repository
git push origin master -
delete the feature branch
git branch -d <branch>
Fork
Introduction
Fork represents a complete copy of a repository. It creates a complete server-side repository copied from the original repository and allows us to freely experiment with changes without affecting the original project.
There are tons of public repositories over Internet. Usually, we are not the direct contributors. Fork offers an opportunity for us to engage in contribution. Fork allows us to clone these public repositories and create our own server-side repositories from them. Then, we can work on forked repositories exactly like we contribute our own repositories. Later on, we can initiate pull requests to original repositories and notify the owners to accept our contributions. Overall, fork allows the maintainer to accept commits from any developer without giving them write access to the official codebase.
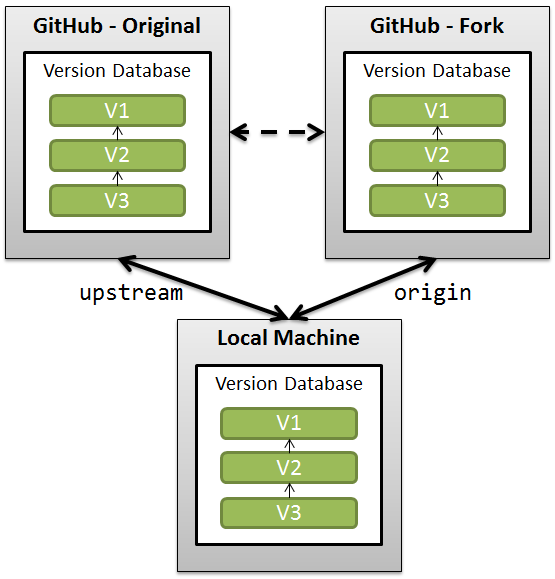
In forking workflow, the original repository is typically named upstream and runs independently. The forked repository (typically named origin) and local cloned copy is runs independently too. origin 和 upstream 并不是 Git 软件本身的硬性规定,而是 GitHub 社区多年来形成的约定俗成(Convention)的标准命称。Git 允许你起任何名字,但全世界的程序员都默认用这两个词。 origin - 指向你自己的 GitHub 仓库地址。当你git clone时的远程地址. upstream - 指向原作者(官方)的源码仓库地址。需要你手动添加(
git remote add upstream ...)
基本流程: Fork 官方仓库 → 本地独立分支开发 → 通过 upstream 同步更新 → 合并到自定义分支
-
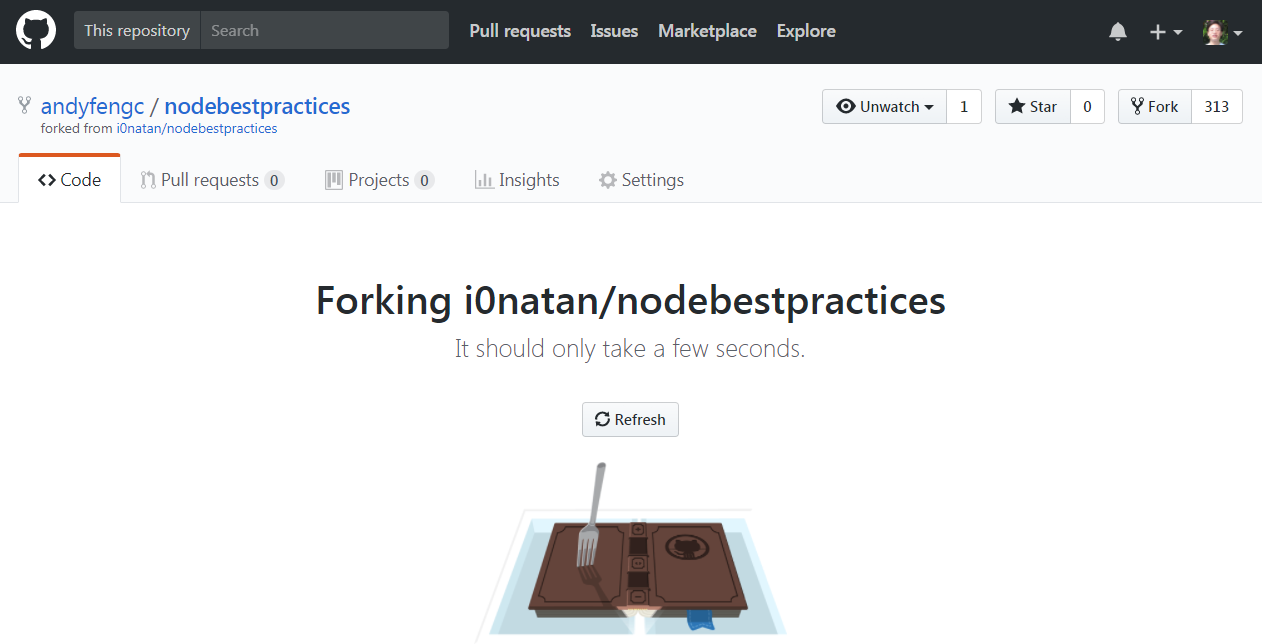
First, we make a fork via the fork button of the project.
 这会在你自己的账号下创建一个完全一样的仓库副本(Repository)。
 - 将你自己的那个远程副本克隆到本地电脑上:
git clone https://github.com/你的用户名/项目名.git - 添加上游仓库(Upstream),重要!
此时,你的本地仓库只认识你自己的 GitHub 副本(通常叫
origin)。你需要告诉它原作者的地址(通常叫upstream):# 添加原作者的仓库作为上游 git remote add upstream https://github.com/原作者/项目名.gitWhereas a regular Git workflow uses a single origin remote that points to the central repository, the Forking Workflow requires two remotes — one for the official repository(typically called upstream), and one for the developer’s personal server-side repository(typically called origin).
if our upstream repository has authentication enabled (i.e., it’s not open source), we will need to supply a username
git remote add upstream https://user@bitbucket.org/maintainer/official-repo.git
This requires users to supply a valid password before cloning or pulling from the official codebase.
检查
git remote -v
你应该看到:
origin    https://github.com/你的用户名/项目名.git
upstream  https://github.com/原作者/项目名.git
- 本地修改与使用
你可以直接在
main分支修改,但最佳实践是创建一个新分支:git checkout -b my-feature # 修改代码... git add . git commit -m "My custom changes" - 同步原作者的更新. 当你发现原作者更新了代码,你想合并进来时:
```
1. 获取原作者的所有更新
git fetch upstream or git pull upstream main
2. 确保你在自己的主分支上
git checkout main
3. 合并原作者的更新到本地
git merge upstream main
将本地更新推送到自己的 fork
git push origin main
4. 切换到自定义分支,合并更新后的主分支. 如果有冲突,手动解决,有2种方法。
方式 A:merge(保留所有历史)
git checkout my-feature git merge main
- 会生成一个 merge commit
- 可以保留你原来的修改
- 如果有冲突,需要手动解决
方式 B:rebase(线性历史,更干净)
git checkout local git rebase main
- 会把你的修改“搬到”官方最新提交之后
- 历史更直观
- Rebase 后,如果你已经推送过 `local` 分支到远程,需要再次推送到你自己的 GitHub (optional)
git push origin my-feature
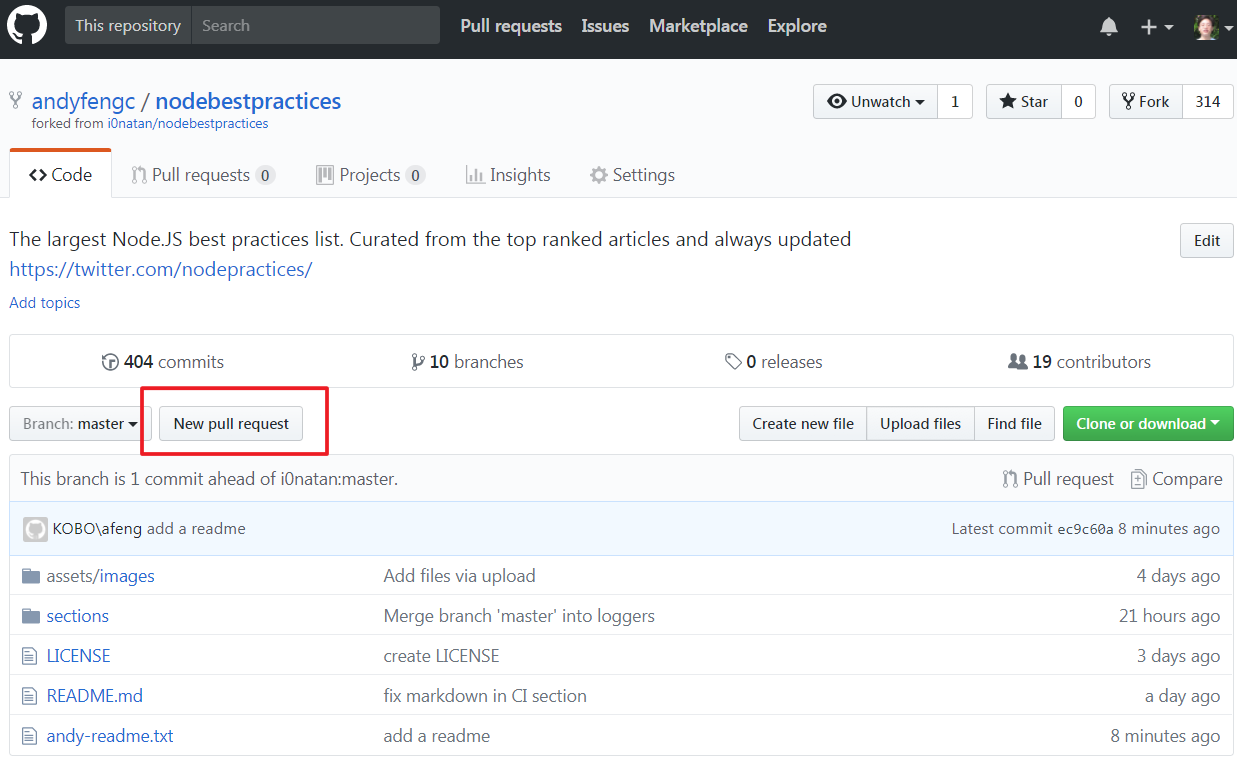
**make a pull request**
Once a developer is ready to share a new feature, we need to do two things.
1. First, we have to make the contribution accessible to other developers by pushing it to their public repository: `git push origin feature-branch`
This merges changes in the origin remote points to the developer’s personal server-side repository, not the main codebase.
1. Next, we need to notify the "official" project maintainer that we want to merge the new feature into the main codebase. We can do this by the "pull request" button and it leads us to a form asking you to specify which branch you want to merge into the official repository. Typically, we want to integrate your feature branch into the upstream remote’s master branch.
> If I am in a branch of a project, after I made some changes. I send a pull request to the project owner. He receive the pull request and merge my code. Pull request works like an alert to notify the owner it is okay to merge. If I do not send pull request, he can also merge my code.
### Workflow ###
Here is how it works:
1. There is an official public repository stored on a server and a new developer wants to start working on the project.
`https://github.com/i0natan/nodebestpractices
2. A developer **"forks"** this official server-side repository. This creates their own server-side copy.

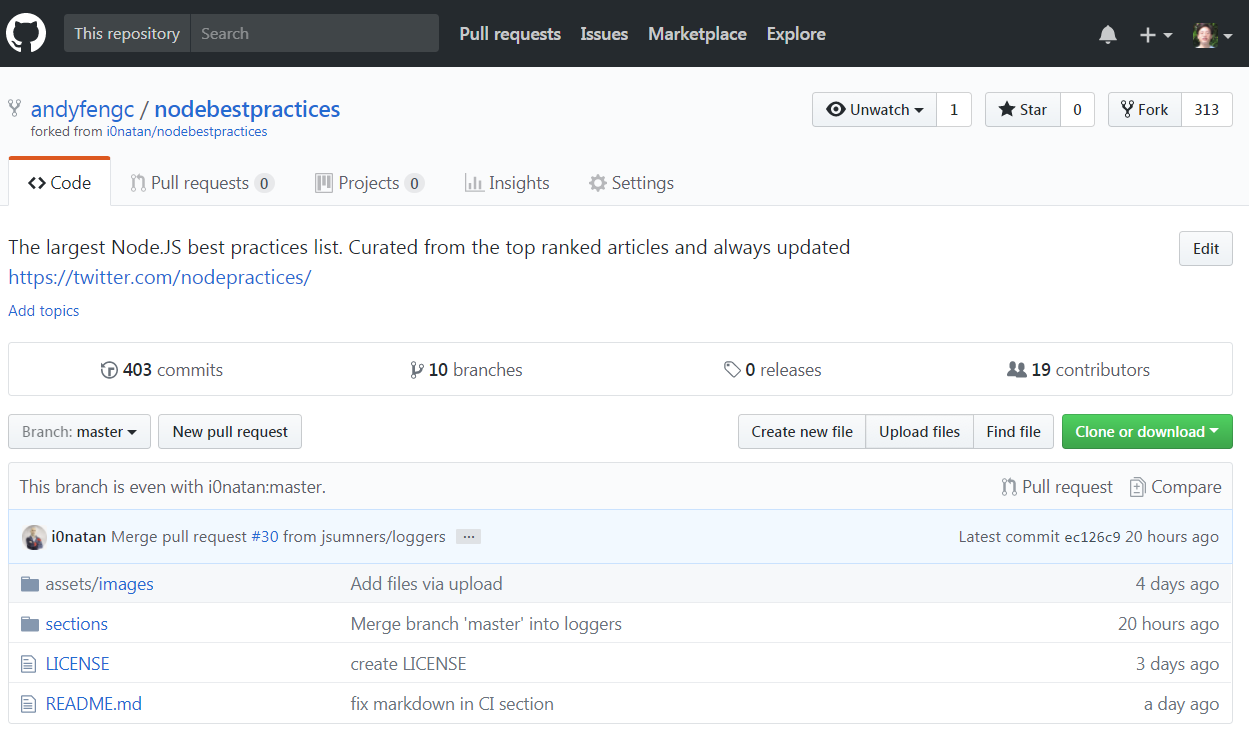
After fork, we have our own repository `https://github.com/myusername/nodebestpractices`
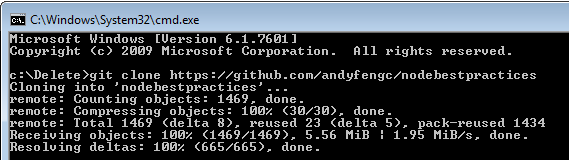
3. The developer clones the new server-side copy to their local system.
`git clone https://github.com/myusername/nodebestpractices`
4. A Git remote path for the "official" repository is added to the local clone. It is a link with the original repo and called **upstream**.
`git remote add upstream https://github.com/i0natan/nodebestpractices`
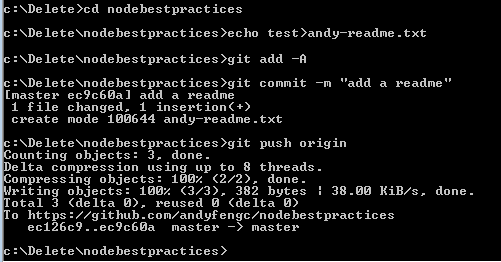
5. The developer makes changes on the forked repository as usual.
6. The developer creates new commits for the changes.
7. New changes are pushed to the developer's own server-side copy.
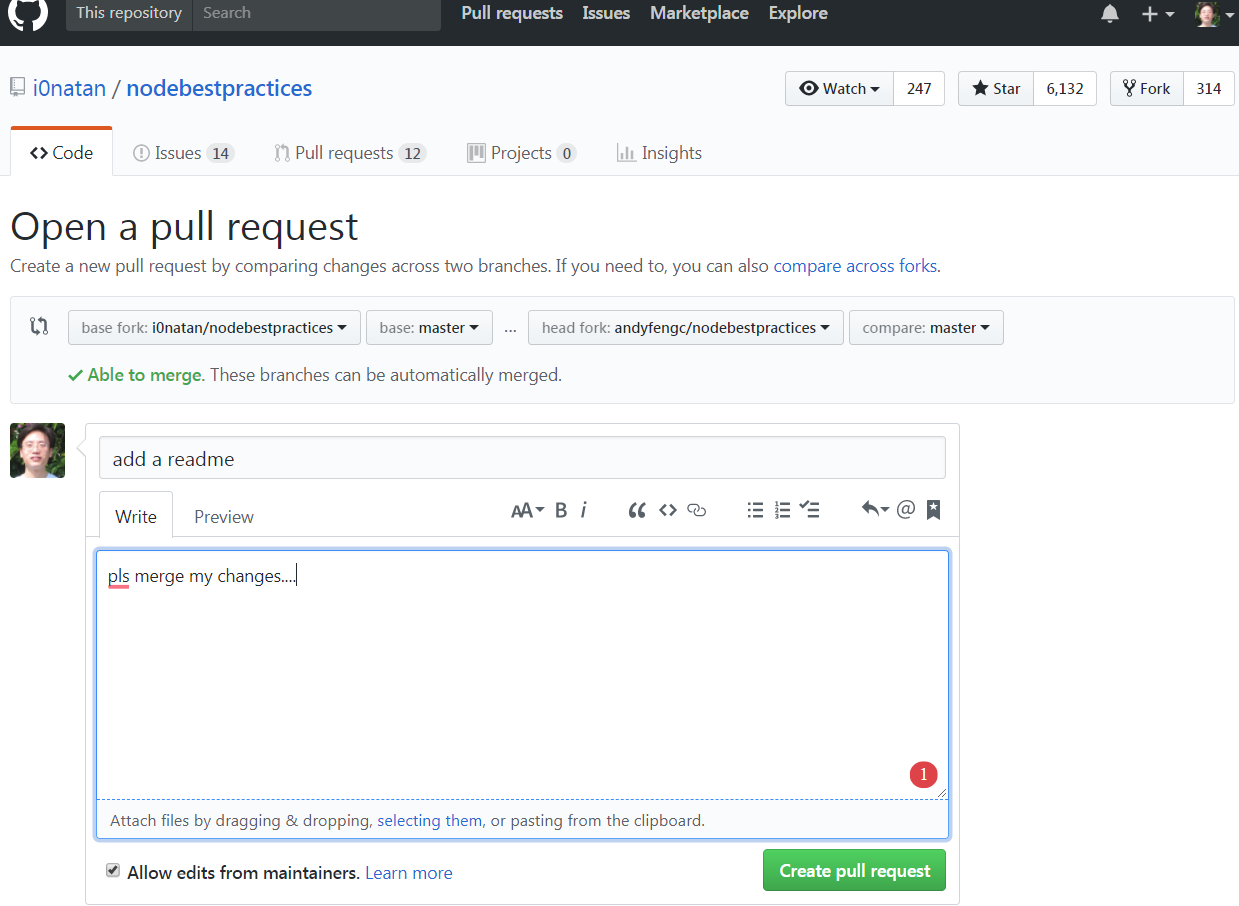
8. The developer opens a **pull request** from the new branch to the "official" repository.

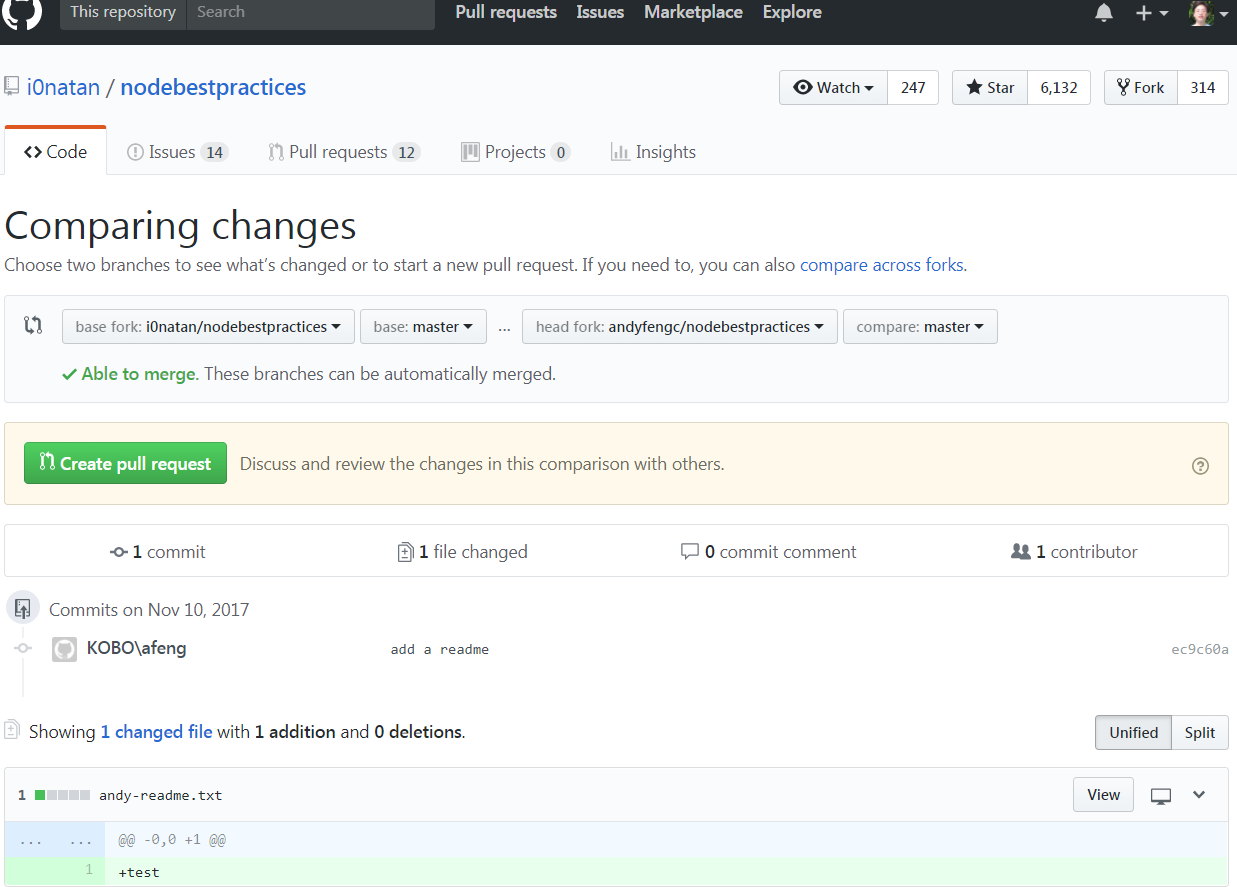
Select the desired forked/upstream branches at the top, enter message and submit the pull request
9. The pull request gets approved for merge and is merged into the original server-side repository.
10. The contribution is now part of the project, and other developers pull from the official repository to synchronize their local repositories.
11. The developer constantly grab new updates from "official" repository in order to keep synchronizing with it.
`git pull upstream master`

### fork vs clone ###
> - Forked repositories can be regarded as "server-side clones" and usually managed and hosted by a 3rd party Git service like Github, Bitbucket.
> - A "fork" is a "clone" from official repository to remote repository. It happens in server sides.
> - A typical "clone" operation is essentially a copy from a remote repository to local repository. It happens from server side from local side.
### fork vs branch ###
> - Fork is just another way to share branches between repositories with other developers
> - Developers should still use branches to isolate individual features to their own local and remote repositories
> - The major difference is how those branches get shared. In the forking workflow, branches are shared between maintainer's official repository and another developer's remote repository. In the branching Workflow, branches are shared between one developer's repositories.
### summary ###
Generally, forks are used to either propose changes to someone else's project or to use someone else's project as a starting point for your own idea. The Forking Workflow is commonly used in public open-source projects. Forking is a git clone operation executed on a server copy of a projects repo. A Forking Workflow is often used in conjunction with a Git hosting service like Github/Bitbucket.
A brief steps of Forking Workflow is:
1. We want to contribute to an open source library
1. We create a **fork** of the repo via a Git hosting service i.e. Github, Bitbucket
1. We use git **clone** to get a local copy of the forked repo
1. We create a new feature **branch** in your local repo then work on it
1. Work is done to complete the new feature and git **commit** is executed to save the changes
1. We then **push** the new feature branch to our remote forked repo
1. We use Git hosting service to open up a **pull request** for the new branch against the original repo
# 从github clone开发,并传到其他代码平台
fork的目的是为了将来的pull request,合并到原始作者的仓库,做贡献。
可以自己clone到本地,二次开发,并随时pull合并最新代码。
## 不fork,直接开始
最佳实践
GitHub 官方仓库(upstream)main 分支 ↑ 你的 GitHub fork(可选) ↑ 本地开发仓库 main(用来merge官方更新) + feature 分支(用来本地开发) ↓ 私有仓库(origin)e.g. bitbucket
👉 **私有仓库 才是你的“主仓库”**
👉 GitHub 只是“上游代码源”
首先,clone 官方源码
git clone https://github.com/official/project.git cd project
添加 GitHub 上游(官方)
git remote add upstream https://github.com/official/project.git
把 Bitbucket 作为你的私有主仓库
git remote add origin https://bitbucket.org/yourname/project.git
检查:
git remote -v
origin bitbucket.org/yourname/project.git (push) upstream github.com/original/project.git (fetch)
准备工作结束。日常开发流程:
从 GitHub 拉最新代码,例如官方的主分支叫做master
拉取官方更新
git fetch upstream
合并官方 master 分支
git merge upstream/master 或 git rebase upstream/master
📌 **rebase 更干净,merge 更安全**
📌 二选一即可,不混用

本地二次开发
git checkout -b feature/your-feature
写代码
git commit -m “your changes”
推送到 Bitbucket
git push origin feature/your-feature
或合并到你的主分支后再 push:
git checkout master git merge feature/your-feature git push origin master
## 如果已经从github fork,但是想改成自己推送到私有仓库
从
origin → 你的 GitHub fork upstream → 官方 GitHub 仓库
到
GitHub 官方仓库 → upstream(fetch only) Bitbucket 私有仓库 → origin(push / pull) GitHub fork(你自己的)→ 可选:github(只在需要 PR 时用)
先查看现在的 remote
git remote -v
origin https://github.com/yourname/project.git (fetch) origin https://github.com/yourname/project.git (push) upstream https://github.com/official/project.git (fetch) upstream https://github.com/official/project.git (push)
在 Bitbucket 创建一个空仓库(不要 README,不要gitignore ,纯干净)。然后添加它:


git remote add bitbucket https://bitbucket.org/yourname/project.git
验证:
git remote -v
bitbucket https://andyfengc@bitbucket.org/andyfengc/myrepository.git (fetch) bitbucket https://andyfengc@bitbucket.org/andyfengc/myrepository.git (push) origin https://github.com/andyfengc/project (fetch) origin https://github.com/andyfengc/project (push) upstream https://github.com/official/project.git (fetch) upstream https://github.com/official/project.git (push)
下面,将Bitbucket 设为真正的 origin
### way1, 断开github的fork。最干净
删除原来的 origin(GitHub fork)
git remote remove origin
把 bitbucket 改名为 origin
git remote rename bitbucket origin
或者修改远程 origin 指向新仓库
git remote set-url origin <新仓库的 HTTPS="" 或="" SSH="" 地址="">
验证
git remote -v
origin bitbucket.org/yourname/project.git (fetch) origin bitbucket.org/yourname/project.git (push) upstream https://github.com/official/project.git (fetch) upstream https://github.com/official/project.git (push)
### way2 保留 GitHub fork,方便将来提PR
git remote rename origin github git remote rename bitbucket origin
验证
git remote -v
最终结构
origin → Bitbucket(主仓库) upstream → 官方 GitHub github → 你自己的 GitHub fork
把当前代码推送到 Bitbucket(一次性),比如推送master branch到bitbucket
git push -u origin master
如果创建仓库的时候不干净,带着历史,就强制push
git push -u origin master –force
📌 这一步之后:
- Bitbucket 有完整代码
- GitHub fork 不再是主仓库
把自己的定制分支推送到bitbucket
git push -u origin local
此时,bitbucket有2个远程branch

本地检查remote
git remote -v
github https://github.com/andyfeng/project (fetch) github https://github.com/andyfeng/project (push) origin git@bitbucket.org:andyfeng/myRepository.git (fetch) origin git@bitbucket.org:andyfeng/myRepository.git (push) upstream https://github.com/official/project.git (fetch) upstream https://github.com/official/project.git (push)
## 以后每天的标准工作流
不要修改master!让自己的master(main)永远跟官方同步。
upstream/main ← 官方源码 │ ▼ bitbucket/master ← 只做同步,不开发 │ ▼ bitbucket/local ← 你的长期定制分支(主战场) │ ├─ feature/xxx ├─ feature/yyy └─ hotfix/zzz
1. 跟官方同步
git checkout master git fetch upstream git merge upstream/master 或 git reset –hard upstream/main git push origin master –force
2. 把官方更新同步到自己的开发分支
git checkout local git rebase master git push origin local –force-with-lease
2. 二次开发总是在自己的分支,永远不在master
git checkout -b feature/xxx
coding
git commit
3. 推送你的成果
git push origin feature/xxx
## 只关心原始代码仓库的特定branch
nop官方仓库默认的branch是develop,但是有master branch, 我已经clone了代码,但我下载的是develop branch的。但是我只关心master,如何调整?
查看本地分支
git branch
只看到
- develop
local
> 本地还没有 master 分支. 说明 master 只存在于远程。
### way1: 远程有若干分支
查看远程分支
git branch -r
origin/master origin/develop …
从远程拉取master分支,在本地创建并切换到 `master`
git checkout -b master origin/master
### way2: fork模式,upstream有若干分支
确保 upstream 是最新的
git fetch upstream
查看远程分支
git branch -r
origin/develop origin/local upstream/develop upstream/master …
基于 upstream/master 创建本地 master 分支
git checkout -b master upstream/master
以后只关心 master,删除本地 develop 分支(可选)
git branch -d develop
如果 Git 不让删(提示未合并),你确认不需要:
git branch -D develop
设置 `master` 为默认跟踪分支(推荐)
以后, git pull, git push. 都会默认针对 `master`
git branch –set-upstream-to=origin/master master
# Stash #
### introduction ###
`Stash` temporarily store changes we have made to your working copy so we can work on something else, and then come back and re-apply these changes later on. stash is a great feature for us to work on multiple branches.
#### Problem ####
Typically, we create a new branch for each new requirement. After development work is done, we merge the changes back to trunk branch. However, we sometimes have to create new branch or switch to another branch for new urgent tasks before the work of current branch is completed.
There are some issues for that:
1. don't commit changes -
1. Case 1: If we switch to another branch with uncommited changes of new added files in current branch, these uncommited changes will also be carried to the new branch that you switch to. Changes that our next commit will be commited to the newly switched branch.
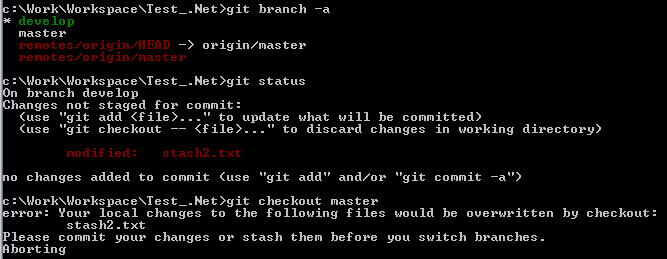
2. Case 2: If we try to switch to another branch with updated files and we already got another branch updated same files, Git doesn't allow us to switch between branches. The reason is Git finds a conflict between the files from the newly switched branch and the uncommited changes from the current branch. Therefore, we are required to commit or stash changes first before switching branch.
e.g. We have "stash2.txt" commited new changes in master branch. Also, we currently in develop branch and got "stash2.txt" updated. We cannot switch back to master branch.
1. commit changes - If we commit uncompleted changes in current branch, then create new branch and start working on, we might include broken code in current branch.
Obviously, we should always keep changes within current branch and find a good way to cache changes if we prefer not to commit dirty changes when switching branches.
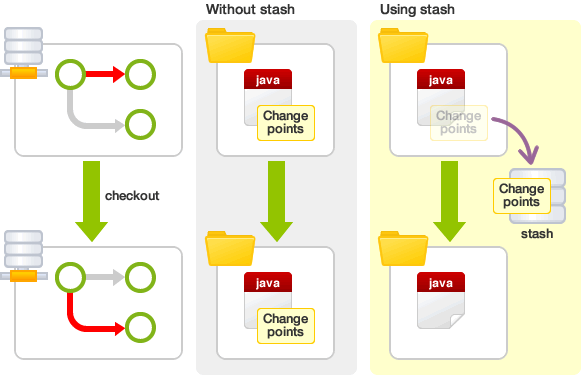
#### Solution ####
Stash is a solution for that. Stashing likes a a drawer to store uncommited changes temporarily. It allows us to put aside the dirty changes in your working tree and continue working on other things in a different branch on a clean slate.
Uncommited changes that are stored in the stash can be taken out and applied to the original branch and other branches as well. It helps us to cache changes and kind of "revert" changes to last commit of current branch. Then we can switch branches safely.
### workflow ###
1. we are working on one branch(develop) and updated "stash2.txt" file
1. we got "stash2.txt" commited changes in another branch(master)
1. For some reason, we have to create or switch new branch. We prefer not to commit "stash2.txt" file and choose to stash it.
1. stash our changes
`git stash`
Current branch will revert to last commit.
1. Display stash list:
`git stash list`
1. switch to new branch, do some work
`git checkout -b <another-branch>`
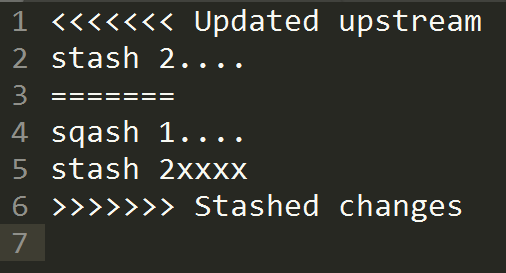
1. pop out changes from git cache. Git will append changes for same files.
`git stash pop`
With this command, it deletes that stash. Please note that the stash is shared within all branches. Which branch we are currently on, the changes will be popped to that branch.
1. Solve conflicts issue if has any. commit and merge changes to trunk branch
Other commands:
Apply most recent stashing without removing
`git stash apply`
apply specified stashing
`git stash apply stash@{stashing_index}`
Remove most recent stashing
`git stash drop`
remove specified stashing
`git stash drop stash@{0}`
Clean out the stashing stack
`git stash clear`
# Merge, Rebase, Squash #
In Git, there are two main ways to integrate changes from one branch into another: the merge and the rebase.
### Merge ###
merge is the easiest option to merge changes within branches
**merge another branch into current branch**
`git merge <another-branch>`
`git merge --no-ff <branch>`
> Merge the specified branch into the current branch, but always generate a merge commit (even if it was a fast-forward merge). This is useful for documenting all merges.
e.g. We have a feature branch and hope to merge changes to master branch:
`git checkout master`
`git merge feature`
Or, we can condense this to a one line:
`git merge master feature`
This creates a new "merge commit" in the feature branch that ties together the histories of both branches, giving us a branch structure that looks like this:
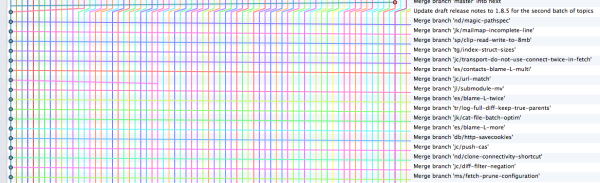
However, each `merge` generates a certain merge point when we incorporate changes. If we have many branches and merge happens very often, this can pollute our master branch's history quite a bit.
`git checkout feature`
`git rebase master`
### Rebase ###
As an alternative to merging, we rebase the feature branch onto master branch using the following commands:
`git checkout master`
`git rebase feature`
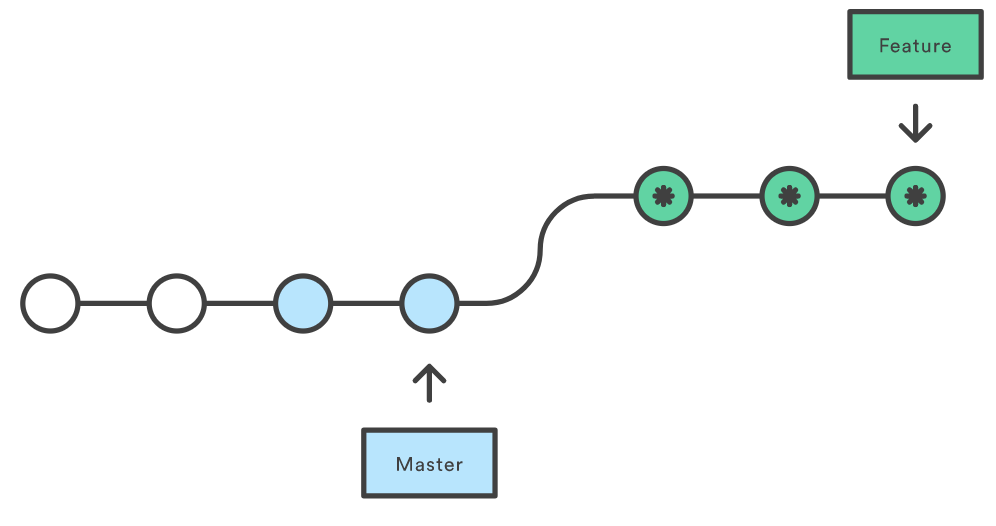
This moves the entire feature branch to begin on the tip of the master branch by incorporating all of the new commits in master. Instead of creating a merge commit point, rebasing re-writes the project history by creating brand new commits for each commit in the original branch and fast-forwards the commit. Rebasing is essentially fast-forward merge.
The major benefit of rebasing is that you get a much cleaner project history. It eliminates the unnecessary merge commits created by git merge. However, we lost the context provided by merge commit.
In practice, if our team members pushed changes prior you in remote branch. We have to use `git pull` to grab those changes. By default, git use `merge` option to incorporate changes. In this case, a new merge commit point will be created. We can use `rebase` option to fast forward to new changes:
`git pull --rebase`
In most cases, we choose `rebase` policy for a clearer git history for code review.
## Squash ##
Squash option can produce a "squashed" commit. It compress multiple commits into one single commit and simplify git history. Squash is not a command but an option and it is used together with merge or rebate.
### Merge + Squash ###
e.g. we squash all commits of feature branch and merge to master branch
`git checkout master`
`git merge --squash`
After squash, there is only one commit from feature branch merged to master branch
#### rebase + squash/fixup ####
e.g. we hope to merge git log
a
b1
b2
b3
to
a
b
1. check commit history via `git log`
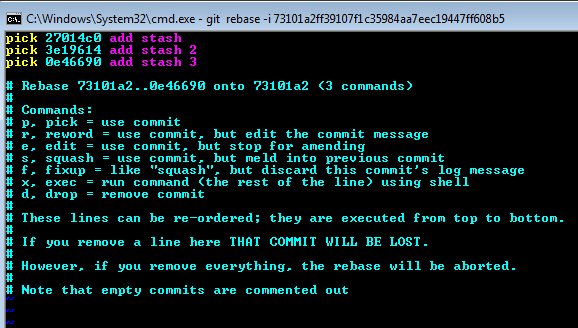
1. enable rebate interactive editing
git rebase -i
1. edit the instructions to modify b2, b3 from "pick" to "squash"
- pick: commit
- squash: meld into previous commit
modify
to
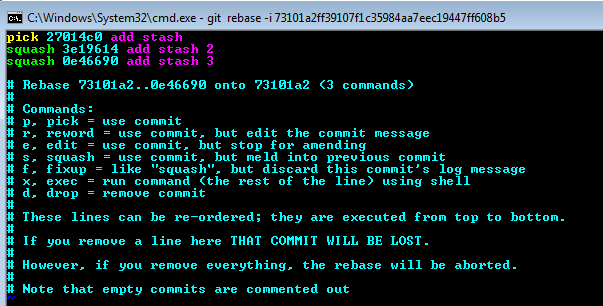
esc > :wq > save and exit
1. enter new commit message
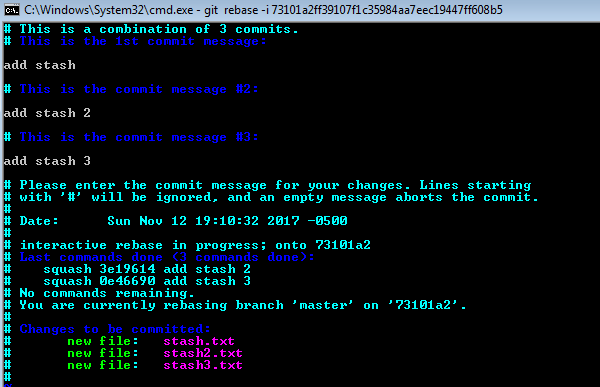
Here is the complete commands

After squash, the rebate will only keep one commit. Basically, squash option let us to squash commits backwards until recent "pick".
fixup option like squash, the only difference is squash keeps all commits' messages but fixup discard all previous commits' messages.
# cherry-pick
对于多分支的代码库,将代码从一个分支转移到另一个分支是常见需求。
这时分两种情况。一种情况是,你需要另一个分支的所有代码变动,那么就采用合并(git merge)。另一种情况是,你只需要部分代码变动(某几个提交),这时可以采用 Cherry pick。
git cherry-pick命令的作用,就是将指定的提交(commit)应用于其他分支。
git cherry-pick
> 该命令就会将指定的提交commitHash,应用于当前分支。这会在当前分支产生一个新的提交,
>
> git cherry-pick命令的参数,不一定是提交的哈希值,分支名也是可以的,表示转移该分支的最新提交。

e.g. 代码仓库有master和feature两个分支。

    a - b - c - d   Master
         \
           e - f - g Feature

现在将提交f应用到master分支。
> 切换到 master 分支: git checkout master
>
> Cherry pick 操作: git cherry-pick f

上面的操作完成以后,代码库就变成了下面的样子。

    a - b - c - d - f   Master
         \
           e - f - g Feature

## 转移多个提交
Cherry pick 支持一次转移多个提交。
git cherry-pick
如果想要转移一系列的连续提交,可以使用下面的简便语法。

> git cherry-pick A..B

> 它们必须按照正确的顺序放置:提交 A 必须早于提交 B,否则命令将失败,但不会报错。

## demo

1. Create a new branch from master

		git checkout -b audit-new master

1. merge specific commit hash

		git cherry-pick 5e7ea3c

1. Fix conflicts

		git add .
		git commit -m "message..."

1. move on merging next commit

		git cherry-pick 806a998

# Fix conflicts
git add .
git cherry-pick --continue
git cherry-pick 806a998
# FAQ
## `git checkout -b`
是 **创建并切换到新分支** 的命令。
git checkout -b 新分支名
默认基于你当前所在的分支创建新分支,并切换到新分支。
git checkout -b feature/pay main
基于 `main` 创建新分支(即使你当前不在 main),并切换到新分支。
新的用法, git 2.23+:
git switch -c 新分支名 git switch -c 新分支名 基准分支
| 命令                             | 基于谁创建  |
| ------------------------------ | ------ |
| `git checkout -b a`            | 当前分支   |
| `git checkout -b a main`       | main   |
| `git checkout -b a origin/dev` | 远程 dev |
| `git switch -c a`              | 当前分支   |
| `git switch -c a main`         | main   |
## git merge
把 分支X 合并进「当前分支」
git merge X X ──▶ 当前分支(HEAD)
| 当前分支    | 执行命令                | 合并方向           |
| ------- | ------------------- | -------------- |
| feature | `git merge main`    | main → feature |
| main    | `git merge feature` | feature → main |
| develop | `git merge main`    | main → develop |
## bitbucket创建ssh
https://bitbucket.org/account/settings/
- 生成密钥:`ssh-keygen`。
ssh-keygen -t ed25519 -C “your_email@example.com” 或 ssh-keygen -t rsa -b 4096 -C “你的邮箱”
然后一路回车

将 `~/.ssh/id_rsa.pub` 内容复制。粘贴到 Bitbucket 的 **Personal settings -> SSH keys** 中。

查看当前地址.如果是 HTTPS,改为 SSH:
git remote -v
git remote set-url origin git@bitbucket.org:用户名/项目名.git ```
References
-
Previous
ASP.NET WebApi file upload implementation -
Next
Best practice of using Git to integrate teamwork